
'Car/Engine'에 해당되는 글 45건
- 2008.10.26 [CAR] Gen Info
- 2008.10.26 [CAR] DLC
- 2008.10.26 [CAR] Engine Family Information
- 2008.10.26 [CAR] OBD Sc
- 2008.10.26 [CAR] How do I check the fluid level on my Tranny?
- 2008.10.26 [CAR] Transmission filter replacement and partial fluid swap?
- 2008.10.26 [CAR] faulty transmission range sensor
- 2008.10.26 [CAR] I have transmission problems ( ECU code: P1870).
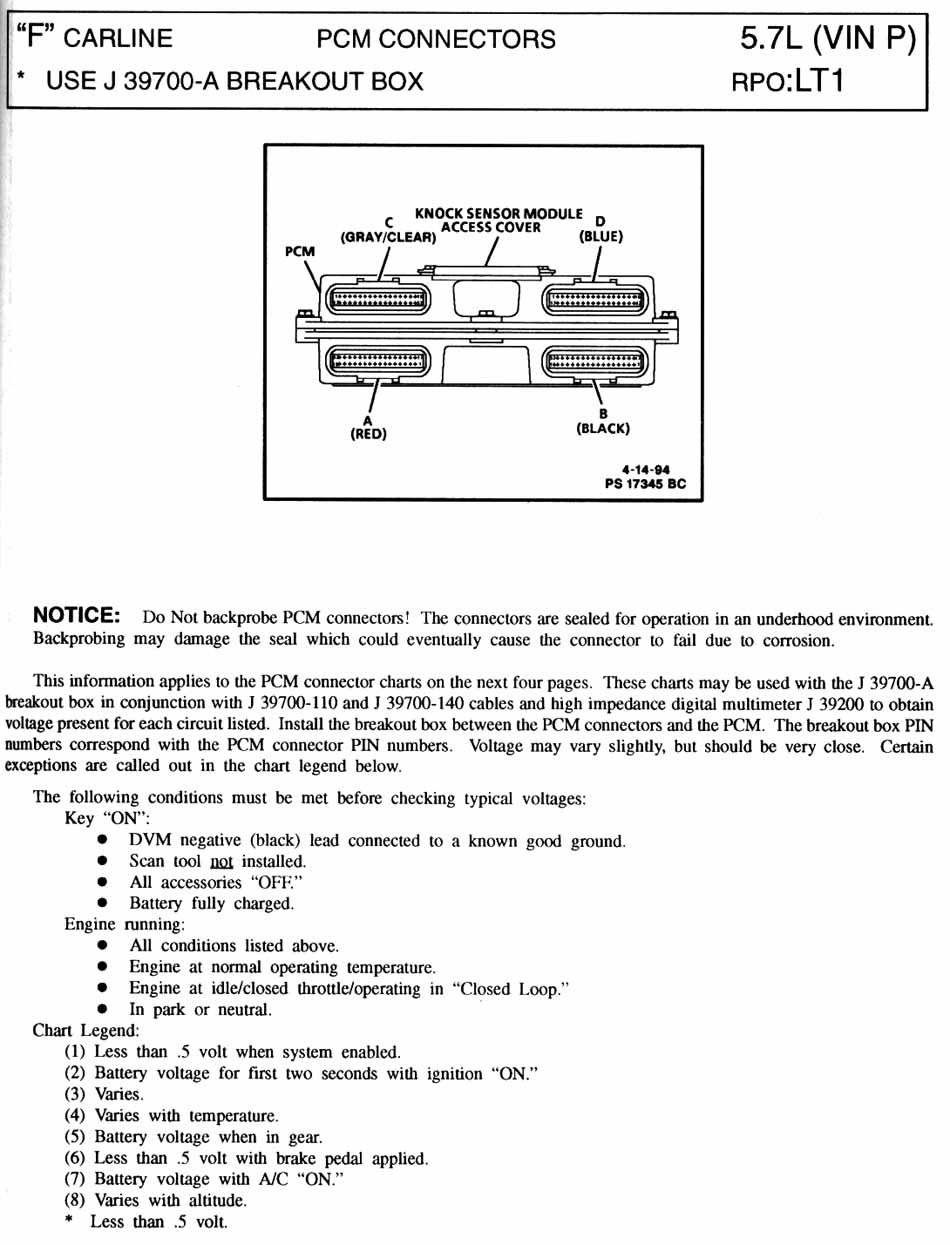
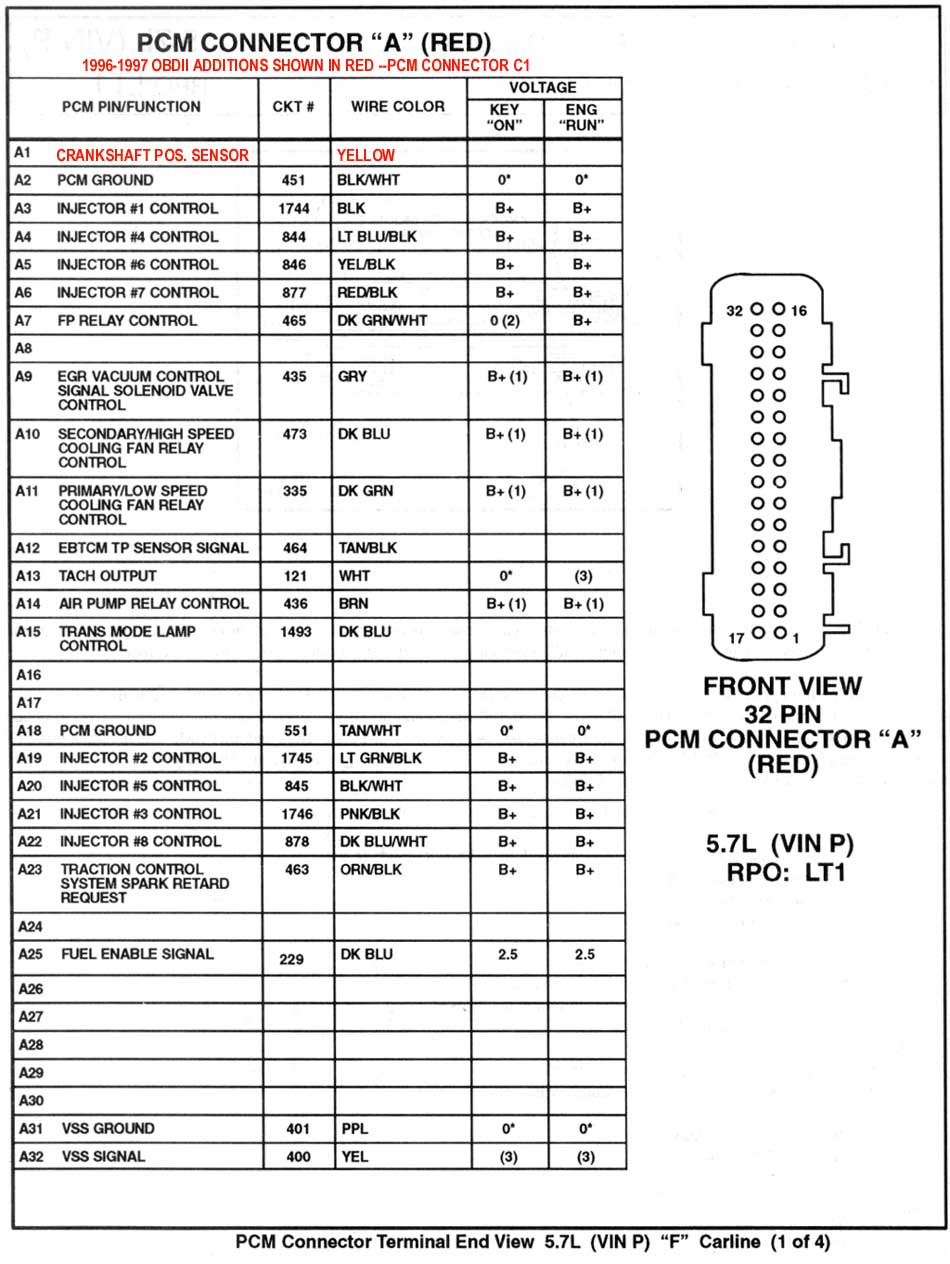
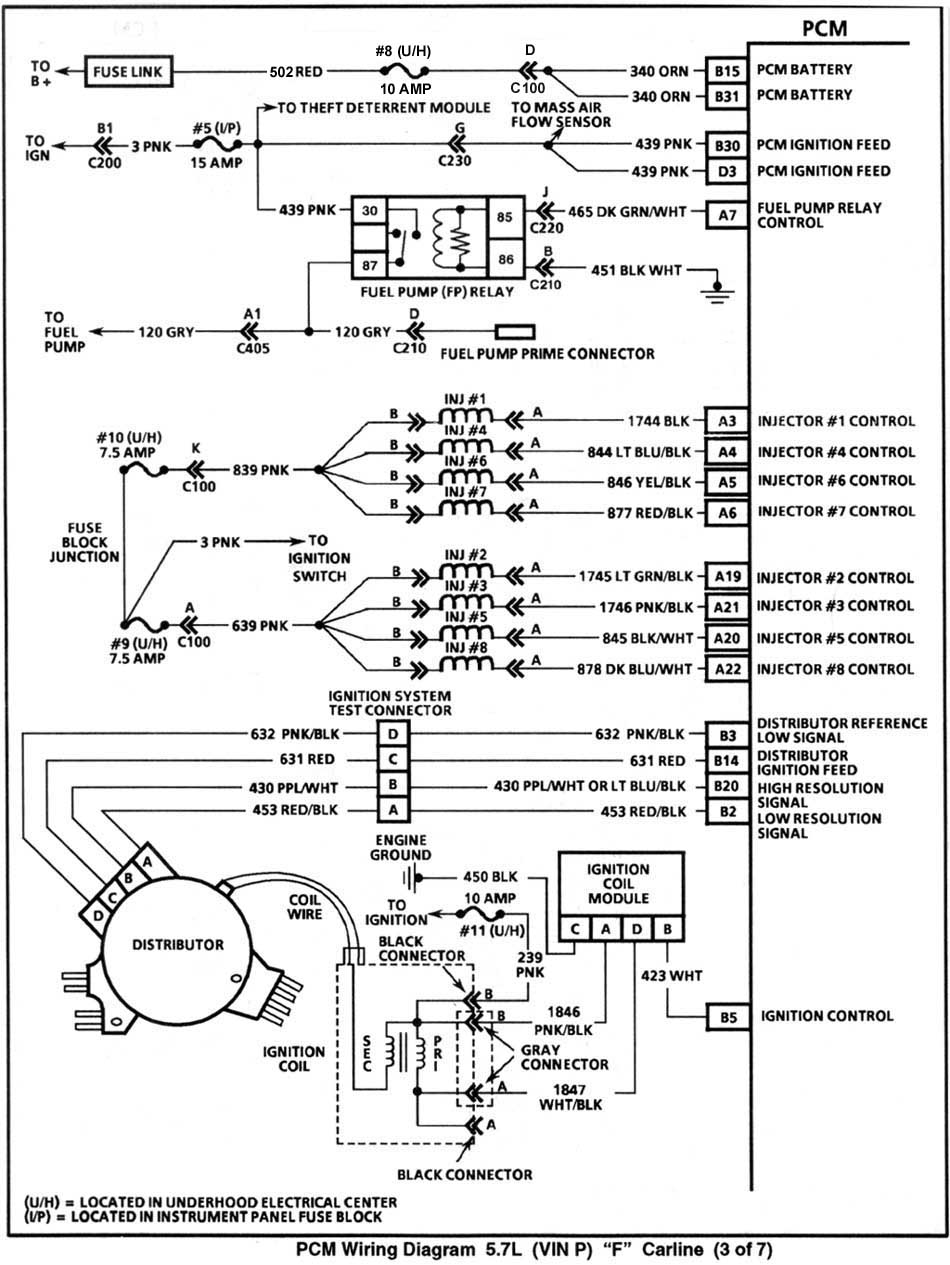
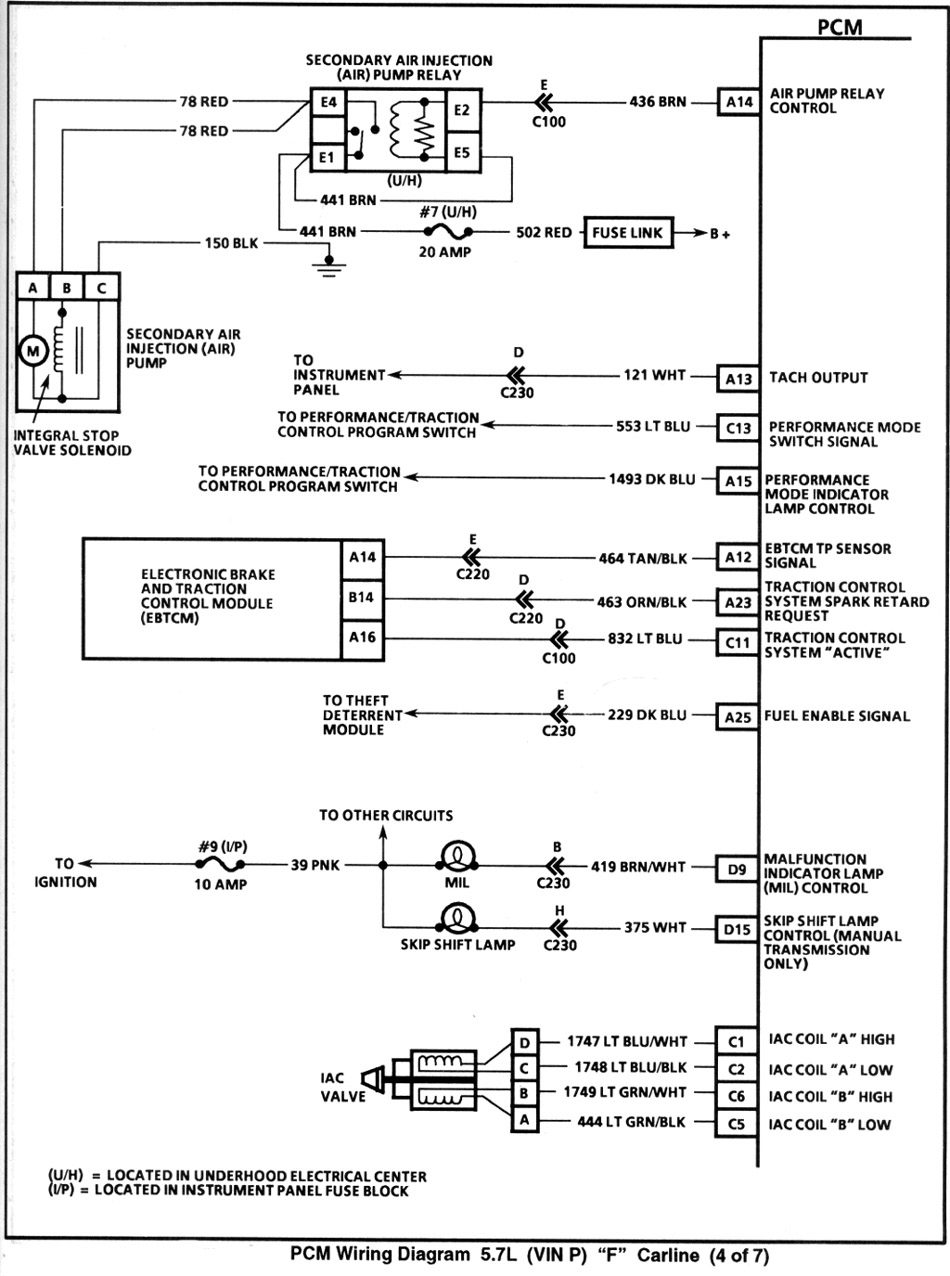
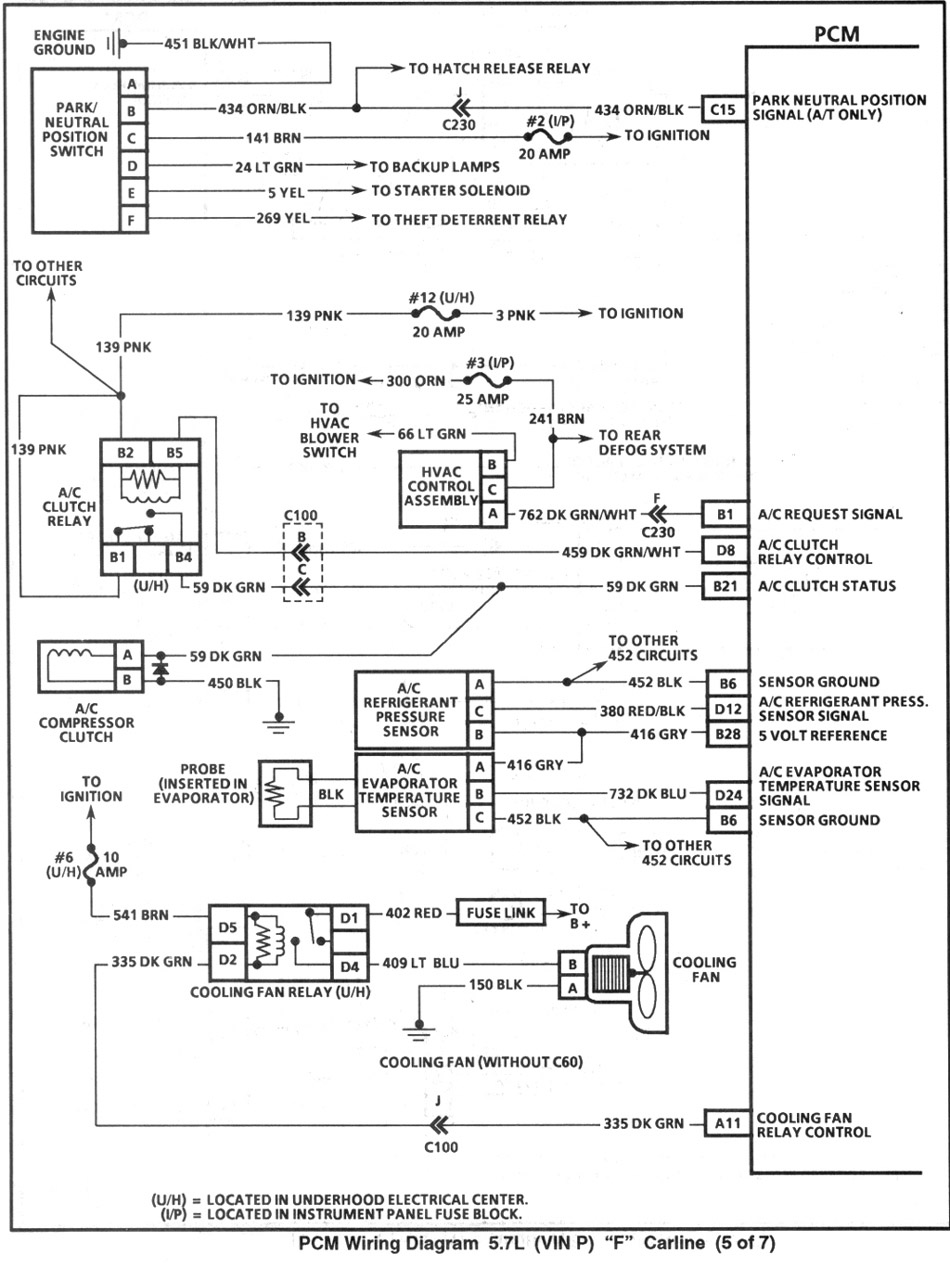
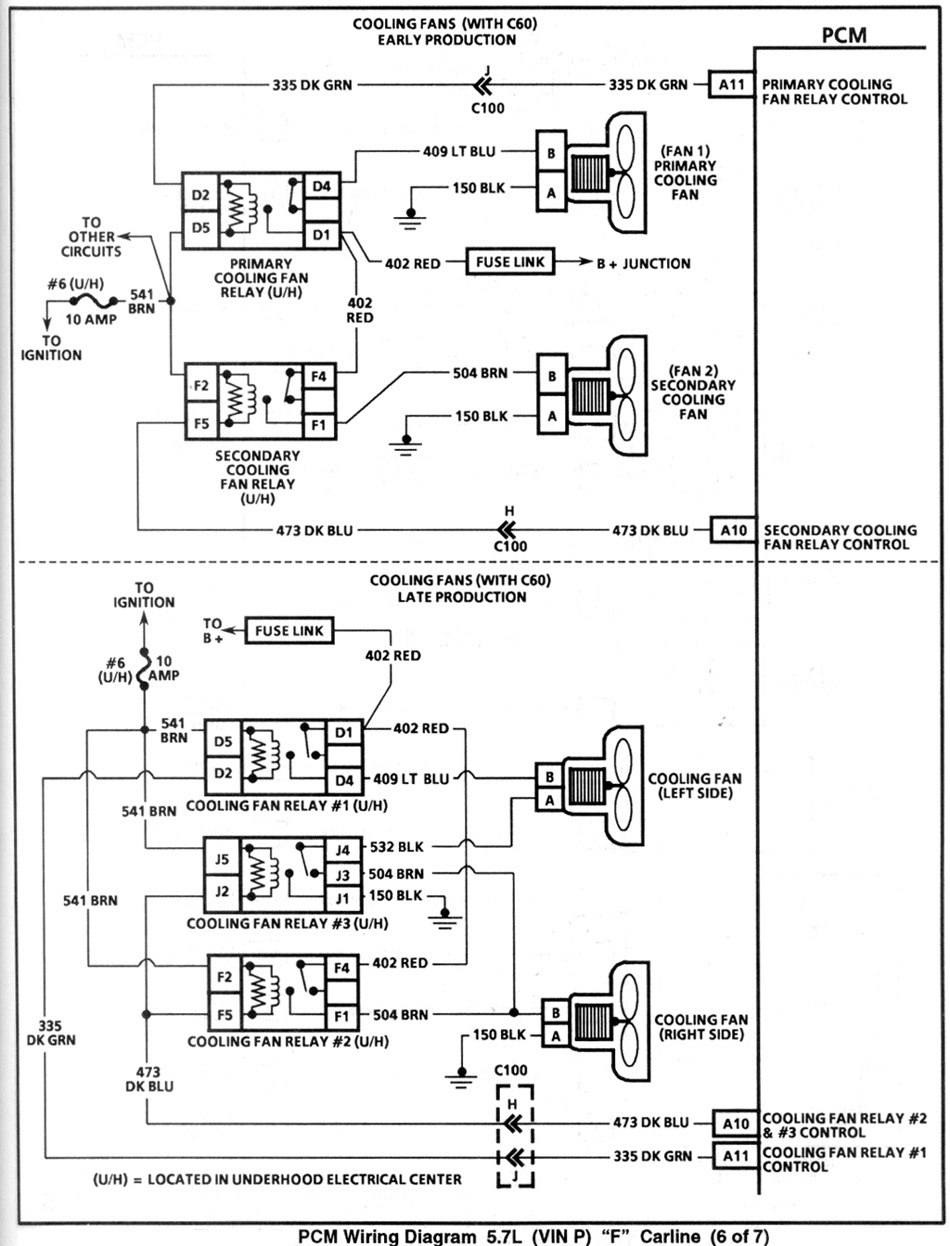
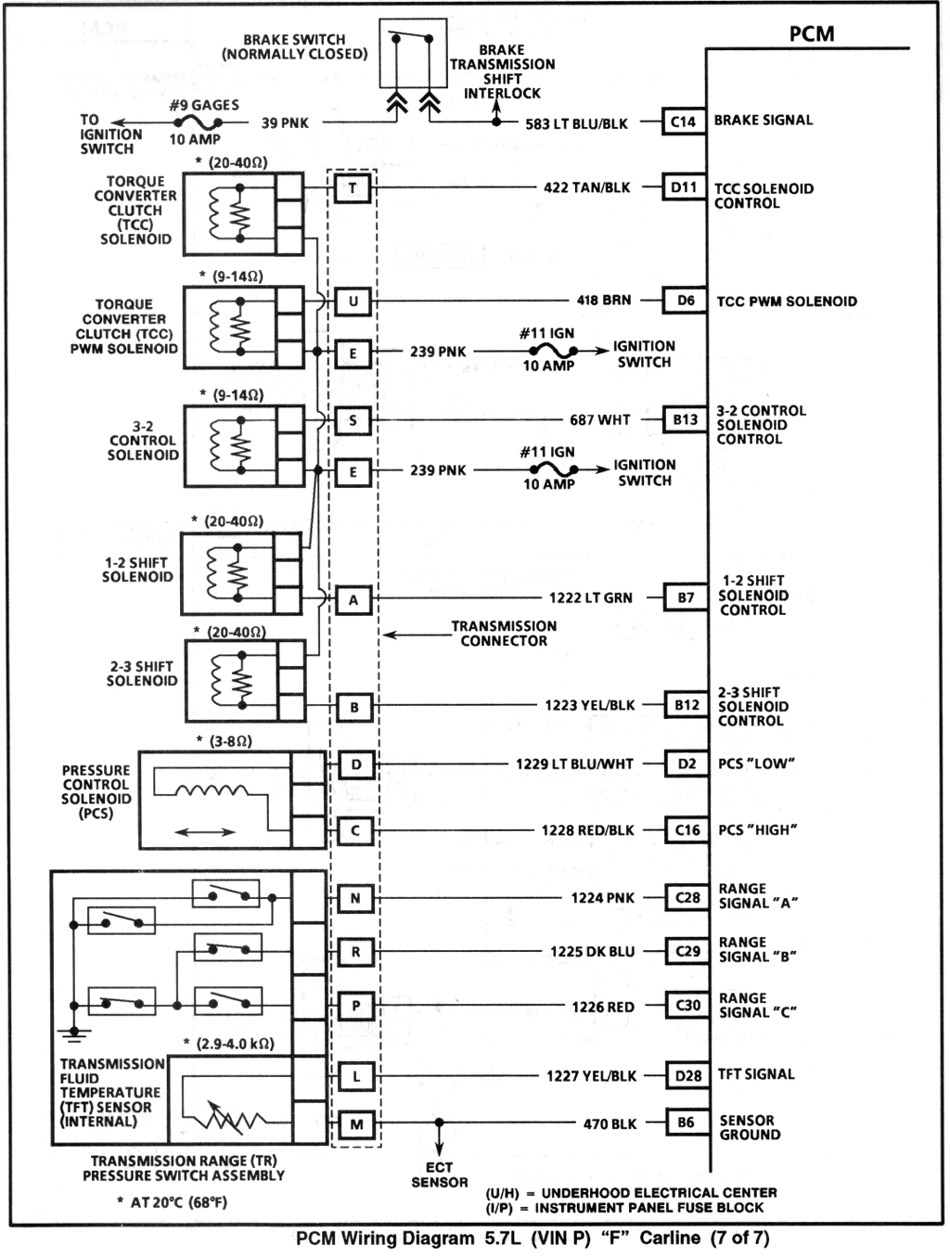
- 2008.10.26 [CAR] About PCM
- 2008.10.26 [CAR] Check Trans and Engine light (code P1870)
Jason Cromer: 800-498-2301 Sam Taylor Buick/Cadillac, Ft. Walton Beach, FL
The sensor resides on the RH side (passenger) of the engine block, in the coolant drain location. The F-body uses only one sensor. Other body platforms may use two sensors on their LT1 applications.
On the 1994-1997 LT1 F-body PCM, there is a replaceable module that receives the knock signal. 1993 ECM's have the receiver circuitry built-in to the computer and have no replaceable module.
You may have heard about an LT4 knock module. This module came from the 1996 LT4 Corvette, that had roller rockers as standard equipment. The LT4 module is tuned to allow for the noise the rockers make (not perceiving it as knock). If you have similar valvetrain modifications on your LT1, it may be a good idea to swap to the LT4 module to reduce the chance of "false knock" (knock not related to detonation).
The LT4 module can be used on 1994-1997 engines (OBD-I and II) and no change of the knock sensor is needed (even though the sensors changed in 1996). There is no specific LT4 knock sensor. However, there are differences in the impedance of the sensors between OBD-I and II as listed in the testing section below. You must use the sensor that is matched to your OBD type (or have a wiring modification as frequently done in an OBD type swap situation).
Key OFF. Connector off at the knock sensor. Measure the resistance between the KS terminal and ground. Resistance should be between 3300-4500 ohms (OBD-I) or 93k-107k ohms (OBD-II). If it is not, the sensor is faulty or the sensor is not making good contact with the block. Try another resistance reading from the sensor terminal to the outside metal of the sensor body.
If all that is good, it might be a faultly knock module (in case of 94-97) or a problem with the computer, itself.
OBD-I (1993-1995) knock sensor GM PART # 10456126 ACDelco #213-96
OBD-II (1996-1997) knock sensor GM PART # 10456287 ACDelco #213-325
Note: It is possible that the LOW COOLANT lamp may come on after this procedure. It should go out after the engine has gone through several heat and cool cycles. Make sure that the remote reservoir is kept at the proper level. If the light seems to come and go, make sure the level in the remote reservoir is proper. Normal operation of the cooling system often causes coolant from the radiator to overflow into the remote reservoir. As the engine cools down, the radiator creates a vacuum and pulls this coolant back into the radiator. The piping from the neck of the radiator to the reservoir must be air tight for this to occur. Since these cars are getting older, it is not uncommon to get a small leak in the pipe that goes under the battery. Acid wears away at the pipe until it makes a hole. Even a small hole is enough to cause problems. A telltale sign is a small amount of coolant under the right front of the car after it is parked a while. Usually, only taking out the battery will reveal where it is coming from, because it slowly drips on the splash panel underneath and may travel along to another area to drip off.
If the lamp is coming on for no apparent reason (you have verified coolant level is fine-that is, checked the level in a cold radiator and verified you have the proper level in the remote reservoir), you have just a few choices: The thermostat only has control of opening temp to allow coolant flow, after that it does nothing but cause a predetermined amount of restriction in the flow. To make the most of the lower temperature thermostat, it should be accompanied by reprogramming of the fans, so that they will come on at a lower temperature. This will help to maintain a lower overall temperature in all driving conditions (especially when stopped in traffic). It is not mandatory that you do this and a 160?can be installed by itself with no other modification. The hydraulic lifter has an internal plunger that has a specific amount of travel. On stock engines, the purpose of preload is to compress the plunger so the pushrod will be riding on a "cushion" (acts like a shock absorber). With stock lifters, turning the rocker nut another ?to ?turn, will normally put you in the ballpark for quiet operation without being too tight and the adjustment should last a long time. Specific lifters like the Comp Cams "Comp R's", have less internal travel. ?turn preload is more than plenty, with 1/8 or just barely any preload being better for high revving engines. Comp actually recommends .002-.004 preload on a warm engine. There are several methods for setting the lash with the engine not running and are listed below. Read through them all. You might prefer one method over another. They all accomplish the same thing. When the arrow is at 12 o'clock you will be at either #1 or #6 TDC. You might have trouble identifying whether #1 or #6 is at TDC when the crank arrow is at 12 o'clock. Probably the easiest way is to look over the other valves or lifter positions. Compare them to the charts below, showing which can be adjusted. Any valve that can be adjusted should be UP (closed) and the lifter/pushrod should be down. Valves that are not to be adjusted will be in varying degrees of being open or DOWN (lifters/pushrods UP). I used to recommend looking at the valves on the #1 and #6 cylinders, but sometimes it can be difficult to tell by those cylinders only. After looking at the charts below and your valves or lifters/pushrods, you should have it figured out rather quickly.
Continue the above procedure for each cylinder until all valves are adjusted to the same amount of preload. This procedure will work for any hydraulic lifter cam with adjustable rocker arms. Refer to this diagram posted above if you need visual reference. If you don't see the proper ac voltage the problem could be the optispark, the harness to the optispark, the PCM or any of the wiring in between. Visually inspect all the connections you can get to for poor contact or corrosion.
edited 5/16/2004
Normal pressure when the engine is not running and lines have been pressurized is 41-47 psi. This same pressure should be observed at wide open throttle (WOT). WOT can be simulated by removing the vacuum hose to the regulator at idle. At idle (because of the effect of the vacuum to the regulator) pressure will be less than what you observe with the vacuum line off. There may be anything from a 3 to 10 psi difference. Note: any indication of fuel in the vacuum line to the regulator, means the regulator is leaking and should be replaced. Check the line for fuel or the smell of fuel.
To fully determine that you don't have a pressure drop off during actual WOT situations, you should tape the gauge to your windshield and take it for a test run. This will tell you if the pump can meet actual fuel flow demands at pressure and not just at a simulated WOT condition (as when removing the vacuum to the regulator).
When you have a gauge connected and the pressure looks initially good and then bleeds off quickly when you shut the engine off, you can do a couple of tests to help you figure out where the pressure loss is.
What the factory manual says to temporarily install, is a set of "fuel line shut off adapters" (probably something the normal guy is not going to have available). You remove the fuel lines from the rail and connect these valves in between. This lets you shut off either side of the lines for testing.
You can do the same thing by pinching the flexible lines to shut them off, but risk breaking them. You might be able to do it (your risk) by using a needle nose vise grips and putting some scrap hose as cushions on the jaws. Then use that to clamp off the line just enough to seal it. Obviously, this is not the best way to shut off the lines and could result in breakage. Heat and age can make the hoses brittle. If you don't want to risk it, don't. It's just a suggestion.
You can use the fuel pump prime connector for pressurizing the system (jumper 12v to it to run the pump).
Watch your gauge as you jumper the prime connector. When you have good pressure remove the jumper and clamp off (or use shut off valve) the fuel supply line (3/8 pipe). If pressure holds, you have a leak on the feed line somewhere before it gets to the clamp (or shut off valve) or at the check ball in the pump. If it still goes down, release your clamp (or open shut off valve). Pressurize the system again, then remove the jumper and this time clamp (or shut off) the return line (5/16 line). If pressure holds, then the regulator is faulty. If pressure does not hold, you need to locate leaky injector(s).
If you can't tell a leaky injector from reading the plugs, you can look and see if injectors are leaking by removing the fuel rail screws and pull the rail and all the injectors up, so you can see under them. Leave them over the injector ports. Pressurized the system and look under the injectors to see if any are dripping. Typically, when the gauge reads: Avoid running your car out of fuel! The fuel also acts to keep the pump cool. Running out of fuel can trigger a pump failure.
If you are having a problem not related to the "normal" way the gauge acts as stated above, there are some things you can check. approximate: To test back to the gauge, ground the purple wire on the body side of the connector back toward the gauge (key ON). The gauge should read empty. With the connector unplugged and no ground applied, the gauge should read full. It is NOT recommended to to push or pull on the pintle of an IAC that has been in service. The force required can damage the threads on the worm drive. Also, do not soak the IAC in any liquid cleaner or solvent, as damage may result. When installing a new IAC, you may move the pintle to match the measurement of the old one. The force required to move a NEW valve will not cause damage to it. Use engine oil to lubricate the o-ring. Tighten attaching screws to 27 lb. in. An easy way to tell what part of the system may have trouble is to go to the vacuum check valve and test the lines back to the mode selector, intake manifold and to the vacuum tank. The check valve often cracks and is the source of a leak, so be sure to inspect and/or test it.
A hand held vacuum pump (like a Mityvac), makes testing pretty easy (your lungs can be used as an alternate vacuum source ;-) ). At the check valve, remove the hoses one at a time and apply vacuum to each and see if it holds. The line to the intake manifold will have to be removed at the manifold and plugged back toward the check valve for you to test the line for leaks. If you find a leak on a particular hose, you will have to trace out the cause on that section.
1996-1997 f-body cars have two cats.
1993-1995 LT1 f-body cars are all OBD-I (regardless of how many cats they have).
1993 LT1 f-body cars can flash trouble codes by shorting 2 pins in the DLC and observing the Service Engine Soon lamp (like most earlier model GMs). 1994 and later must use a scan tool. The computers changed from ECM (Engine Control Module) in 1993 to PCM (Powertrain Control Module) in 1994 and later (adding electronic transmission control). Though 1993 and 1994 were both OBD-I, they used different computers. 1993s used the replaceable chip type (PROM), while 1994 and up used flash memory for storing the program (EEPROM).
1996-1997 LT1 f-body cars are OBD-II.
1993 LT1 f-body cars have two 1 wire, non-heated O2 sensors. 1994-1997 have two 4 wire, heated O2 sensors (with 1996-97 cars having two additional rear (post cat) O2s to comply with OBD-II). On the f-body, front O2s use a flat connector. When rear O2s are present, they use a square connector.
The only 1995 f-body engine that is OBD-II is the 3.8L V6 that came out during the model year (replacing the 3.4L V6 that was OBD-I).
RPO NA5 = Federal Emissions System
RPO NB6 = California Emissions System
![]()
Wholesale prices and no rip-off shipping.
Dal Slabaugh: retired as of 12/1/2007
Best wishes and thanks for all the years of service to the GM community!
![]()
The Keyless Entry Receiver is capable of accepting Vehicle Access Code (VAC) programming from any two random Transmitters. One or two Transmitters can be programmed. When two Transmitters are programmed, they must be programmed during the same program sequence, one after the other but not simultaneously. The Transmitter is manufactured with a permanent VAC combination (one of over 4 billion combinations) that cannot be changed for the life of the Transmitter. The Receiver can only be programmed by the Transmitter when it is powered at the Battery input at connector C2 terminal "F" and the program input line is grounded to connector C1 terminal "A".
Programming procedure:
Important
![]()
NOTE: Always program both transmitters when replacing a lost or damaged transmitter. The first transmitter code programmed will always be in both memories until a second transmitter is programmed within the same sequence.
![]()
Action
Normal Results
![]()
The BCM can display a series of DTCs, when it is placed in the diagnostic mode. These DTCs are displayed as flash codes through the "Security" indicator lamp on the instrument cluster (much like the 1993 and earlier OBD-I codes are flashed on the SES lamp). During normal operation, if the BCM detects a fault on a monitored circuit, there will be no flashing or any indication that a fault has occurred, though you might detect a system malfunction. The system faults will be recorded as "Current" or "History". A "Current" DTC means that the condition was present when the diagnostic mode was entered. A "History" DTC means the condition has occurred since the BCM was installed in the vehicle, but may not be present currently. If a "Current" DTC is present, the associated "History" DTC will always be present. When you work on systems associated with the BCM, you should always check for DTCs.
Diagnostics is entered by performing the following steps:
The BCM will begin to flash DTCs 4 seconds after entering the diagnostic mode, from the programming mode. Each flash of the "Security" indicator lamp on the I/P represents a number. For example, one flash followed by two quick flashes represents a code 12. Each code is displayed 3 times before the next code is displayed. Any DTCs present are displayed in numerical order. Once the last code is displayed, the list begins over again with the first code. The display continues until the diagnostic mode is exited.
History DTCs are those indicating that the BCM previously detected a fault with later disappeared. Any DTC that has a 3 as its first digit is a History DTC. The reason could be that the fault is a true intermittent only happening occasionally or that the system which the DTC monitors is not currently being operated.
If a visual physical check does not find the cause of the concern, the vehicle can be driven with a DVM connected to the suspected circuit. An abnormal voltage or resistance reading when the concern occurs indicates the concern may be in that circuit.
"Current" DTCs (21-25) will remain stored and display as long as the BCM detects the fault criteria. "History" DTCs (31-35) can be cleared by pressing the door lock switch for a period of 4 seconds while the BCM is in the diagnostic mode. The chime will sound 3 times at the end of the 4 second period as a confirmation that the DTC(s) have cleared.
BCM Schematic for 1996 (1997 probably the same).
BCM DTC
DESCRIPTION
12
Begin Diagnostic Display
21/31
Courtesy Lamps Feed (Circuit Shorted to Ground)
22/32
Courtesy Lamps Return (Circuit Shorted to Battery +)
23/33
Retained Accesory Power (Circuit Shorted to Ground or Battery +)
24/34
Fasten Seatbelt Indicator Lamp (Circuit Shorted to Ground or Battery +)
25/35
Security LED present (with AU6 only)
41
Last Transmitter Message Received Valid (with AU0 only)
42
Last Transmitter Message Received had Invalid ID (with AU0 only)
43
Last Transmitter Message Received had Sumcheck Error (with AU0 only)
44
Last Transmitter Message Received had Encryption Error (with AU0 only)
45
Receiver Processing Currently in 20 Second Lockout (with AU0 only)
55
Begin Configuration Display
-## Hardware Configuration
-## Software Configuration
![]()
Flush procedure:
Bleed procedure:
edited 10/10/2004
![]()
튏
튔
Ohms
100
212
177
90
194
241
80
176
332
70
158
467
60
140
667
50
122
973
45
113
1188
40
104
1459
35
95
1802
30
86
2238
25
77
2796
20
68
3520
15
59
4450
10
50
5670
5
41
7280
0
32
9420
-5
23
12300
-10
14
16180
-15
5
21450
-20
-4
28680
-30
-22
52700
-40
-40
100700
Use a Digital Volt Meter (DVM) set to ohms to measure resistance. Note: Use a high impedance meter (at least 10 megohm) when dealing with the PCM. Most modern DVMs will do, but your old analog meter can damage the PCM. It is also a good idea to get a " reference" from the meter you are working with. With the DVM on the ohms scale, touch the two meter leads together and note the ohm reading. It may not always be perfectly zero, but may be within a tenth or two. Now when you take an ohm reading, you will know what the meter will show when there is really no resistance.
If the sensor seems to be ok, you may also need to test at the harness connector for proper lead conditions. Use your test meter set on the dc voltage scale to do this. You will need the key in the RUN position, but don't have to start the car.
Footnote: If you ever have to test the IAT, it operates the same as the two lead coolant sensor. The same temp vs. resistance table above is applicable to the IAT, as well as the +5vdc lead and ground wire at the harness connector.
edited 1/03/2005
![]()
The knock sensor system is used for the detection of detonation. The computer retards spark advance based on the amount of knock received. The knock sensor produces an ac voltage according to the amout of knock. The computer receives the signal and it's programming determines how the computer will change the spark advance.
With the connector off the knock sensor, check for 5v on the harness terminal with key ON. Continue if that is good. If not good, check at pin C8 (1993), D22 (94-97) on back of computer. If voltage is ok at the back of the computer, repair the wire from the computer to the sensor.
edited 7/29/2005
![]()
Drain
It is always a good idea to keep coolant away from the distributor (optispark) to avoid any potential problems when doing any of this work.
Refill
If, after doing work, you want to verify the coolant level for a few days, check that the level is to the top of the radiator neck when the engine is cold. Add coolant to top it off, if needed. Then, also make sure that the level is correct in the remote reservoir.
edited 3/16/2008
![]()
Electric cooling fans attached to the radiator keep the LT1 from overheating when there is little or no air passing through the radiator core (car going very slow or stopped and engine running). It is normal for the temps on the gauge to go up to the middle or past middle of the gauge before the fans kick on. The middle of the gauge is in the range of 210?- 220? With factory programming, the PCM will command low speed fans (or primary fan) "ON" at 226?and "OFF" at 221?and high speed fans (or secondary fan) "ON" at 235?and "OFF" at 230? The fans should come on before it gets to any part of the red zone. (see "dual fan configuration" below about primary and secondary fans)
The f-body LT1 uses a 180?thermostat as stock.
The PCM gets it's temp readings from a sensor that is in the water pump. If the reading the PCM receives is inaccurate, the fans may not come on at the correct time. The PCM also uses this temperature for lookup in fuel calculation tables. If there is a problem that causes the reading to be always low (cold), the PCM will add extra fuel. This can cause hard starting when warm and an overly rich condition when running.
The gauge gets it's information from a sensor that is in the driver's side head. Inaccurate gauge readings can be from this sensor or it's wiring (the wire burned on a header pipe is common). The temp that the PCM sees can be monitored with a scan tool and compared to the gauge reading. They should be close, but don't expect them to be "perfectly" synchronized.
The fans are programmed to come on when the a/c is turned on. A/c Pressure monitoring sensors feed the PCM info and depending on the situation, the PCM may command the fans off for brief periods. Also, when the car reaches sustained higher speeds, the fans may be commanded off so incoming air can flow through the radiator unimpeded and provide the cooling needed.
Fans will also come on when the SES lamp comes on. The PCM does this when certain (most) DTCs are detected to protect the engine from a situation where it may overheat.
There are two versions of the dual fan configuration:
These fans use a two relay architecture that can be seen in the fuse/relay panel that is under the hood.
2 Relay System
PCM Commanded Fan Operation
PCM Wire Color Grounded
Fan Operation
Relay Operated
#1
#2
#3
Primary@226?
Drk Grn @A11
Primary (LH) fan full speed
X
-
n/a
Secondary@235?
Drk Blu @A10
Secondary (RH) fan full speed
X
X
n/a
3 Relay System
Low Speed@226?
Drk Grn @A11
Low Speed (both fans)
X
-
-
High Speed@235?
Drk Blu @A10
High Speed (both fans)
X
X
X
For both fans to operate in either system, both relay leads must be grounded. Grounding only the Drk Blu wire will result in only the RH fan operating at high speed.
Here are some fairly simple things to check for various complaints:
Other cooling issues
![]()
The low coolant sensor is a most common cause of complaint. If it gets dirty, it may cause the lamp to come on when the coolant level is actually ok. Sometimes it fails and no amount of cleaning will fix it. The sensor is only connected to the lamp on the dash. It does not report to the PCM and no DTC's will be set. Because of this, some people choose to simply unplug the sensor to get rid of the annoyance without having to fix it. Unplugging it will make the lamp go out, but you will have to monitor the coolant level yourself. As critical as the coolant is to the LT1, having it working makes sense.
Thermostats and cooling
The temp rating of the thermostat is merely at what temp it will begin to open and allow coolant flow. It is purely a mechanical, temperature reactive device and has no external control or monitoring. A frequent reason behind a lower temp thermostat is to be able to make use of more aggressive spark advance without the engine having any spark knock (detonation or pinging). Excessive spark knock is detrimental to the engine. Spark knock is also monitored by the computer and timing advance is pulled (retarded) by the computer. When timing is retarded, performance and power will decline.
There is a fine line between between enough spark advance for high performance and the penalties for too much. The engine temperature plays a role in that the coolant wicks away heat from the combustion chambers in the head. Higher overall engine temperature results in higher overal combustion chamber temperatures. Installing a lower temperature thermostat alone may actually decrease performance because a certain amount of heat is needed to burn the air/fuel mixture efficiently. If you see a decrease in gas mileage with a lower thermostat, alone, this may be the reason. The trick is to lower the temperatures but add enough timing to increase performance over what it was originally.
An often asked question is "Will my engine stay cooler with just a 160?thermostat?". The answer is yes, as long as there is good air flow across the radiator and the cooling system is working efficiently. Note that engine temps will still climb as they did before when you are stopped (as in traffic). However they may not rise as much, since you are starting out at a lower temperature than before. When you are moving again, it will be possible for the temps to lower more than what the 180?thermostat would previously allow. Cruising down the road, your engine should definitely stay cooler than before. Remember that the rated temperature of a thermostat is the temperature that it begins to open. While crusing on a moderate temperature day, an LT1 will generally run 10?20?warmer than the thermostat temp rating. Make sure you use the correct, long LT1 thermostat as described in the troubleshooting section above.
Something else to consider, is that when the engine gets to ~220?(even before the stock fan ON temp of~226? and you are at MAP loads of 70Kpa or more, the PCM begins to retard the timing. That is one reason why people feel their cars don't run well when they are hot. The GM folks built the retard into the spark tables because when the engine is hotter, there is more chance for spark knock. If you can keep the temperatures from getting up into that range, then you might feel more power when you need it.
Altering the fan ON temps can be done through reprogramming the computer or an aftermarket "fan switch" such as sold by SLP and JET . Manual fan switches can also be wired up to operate the fan relays so that the fans can be operated at any given time the driver wants (like in staging lanes). There are explanations on how to wire the manual switch up on the 'net and there are even a couple of wiring diagrams on my main Tech Page. If you look at the fan schematics, you can probably see that there can be several solutions to operating the fans manually, either by controlling the relays (my preference) or powering the fans directly with 12v and a switch.
edited 9/06/2007
![]()
Do this when the engine is cool (like after sitting overnight or for several hours where there is no residual pressure in the system). This way there will be no need to drain any extra coolant from the system.
8/05/2005
![]()
T56 Service Manual (pdf format)
Right click if you want to download and save
Left click to view online
![]()
Zero lash is when you go from having slack between the lifter, pushrod and rocker arm, to the exact point of no slack. The lifter needs to be on the base of the lobe when setting valve lash. When a cylinder is at TDC, both lifters should be at the bottom of their travel (base of the cam lobe).
Gauging zero lash by hand is not an exact science. When setting the valve lash with the engine not running, you can get close enough by doing the "spin the pushrod" method. Loosen the rocker arm until you can feel slack in the pushrod to rocker arm. Spin the pushrod with your fingers while tighening the rocker arm back down. When you BEGIN to feel drag while spinning the pushrod, you are at zero lash. Once zero lash is reached, stop and add your preload. DO NOT go back and try to feel the adjustment. The lifter will immediately begin to bleed down a little. Tension on the pushrod will relax and this will make it seem like your adjustment did not work. If you want to recheck zero lash, you must loosen the rocker arm nut and tighten it down again while spinning the pushrod as before. At that point you want to set the preload and LEAVE IT ALONE.
For reference:
3/8" stud: ?flat = .003472"
7/16" stud: ?flat = .00416"
Rotating the nut 1/6 of a turn (until the next flat side is in the same position as the previous flat side) is a "flat".
Consequences of improper adjustment:
Too tight - the valves will not completely close and you will lose compression. The engine will run rough, if it will run at all.
Too loose - the rocker arms will make noise from the slack and pushrods could be dislodged. Possible damage could occur from either extreme.
Some like to adjust the rockers while the car is idling. If you wish to do this, loosen one rocker at a time until you can hear it click. Tighten the nut, but don't exert downward pressure on the rocker arm with your socket. At the point when audible clicking is gone, tighten the nut another 1/4 turn for your preload (Comp R lifters, less as noted above).
If you have never had the crank hub off (or know for sure that it's orientation is correct), you can use the arrow that is on the balancer to tell you where you are. You don't have to spin the crank every 90?with this method.
When at #1 TDC you can adjust the following valves:
Intake: 1, 2, 5, 7
Exhaust: 1, 3, 4, 8
Rotate the crank one revolution until the pointer is again at 12 o'clock. This will let you adjust the remainder of the valves. If you did #1 the previous time, you should be now at #6 TDC.
When at #6 TDC you can adjust the following valves:
Intake: 3, 4, 6, 8
Exhaust: 2, 5, 6, 7
If you want to set the lash by bringing each cylinder to TDC, watch the valves and the pointer on the balancer and follow the Firing order:
1-8-4-3
6-5-7-2
Adjust both intake and exhaust of the cylinder that is at TDC. You will have to make 2 revolutions of the crank, stopping at 1/4 (90? turn intervals for each cylinder.
Another cylinder by cylinder method that does not require looking at the balancer position, follows:
(A remote starter switch is quite helpful)
Here is something additional for those that use "poly locks" (typically used with roller rockers).
Since the poly lock is not a prevailing torque fastener like the nut used with the stock rocker and ball arrangement, it spins freely on the rocker stud. This gives you an advantage to finding zero lash. With the allen lock backed off, spin down the nut until it just stops. This is very close, if not right on zero lash in most cases. Check your pushrod for proper movement and play with it to get a feeling just how snug or loose the nut should be to obtain zero lash. Once you do that, you can just use the nut to reach zero lash and not have to worry about messing with the troublesome pushrod. This will speed up your valve adjustment.
Another aide is to make a mark on the top of the nut so that you can easily see how far you have turned the nut. I always found it a little difficult to obtain the exact amount of rotation on the nuts under the cowl, because of there being less room to swing a ratchet or other tool handle. I used a little dab of white paint on the top and was easily able to tell when I made a half turn or whatever was needed. Now, I can just use a wrench to tighten the nuts, then throw the allen wrench on it and snug the set screw down (while holding the nut).
Some like to run the allen set screw down and then tighten it and the nut together. If you overdo it this way, you may break the nut. I always have good luck with setting the nut and then the set screw. With all the variables in making adjustments to hydraulic lifters like the number of turns for preload, methods of finding zero lash and trying to see what you are doing under the cowl, slight errors are common. Just try to be as consistent as possible and use the method that works best for you.
edited 1/6/2008
![]()
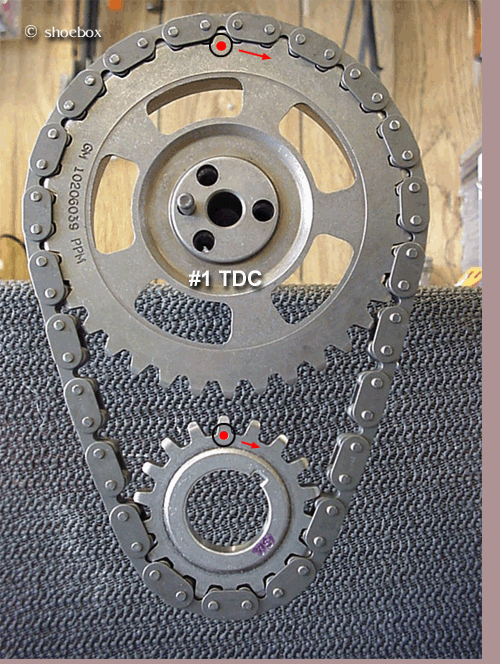
Cam timing animated gif
left click to view or right click to download
![]()
The opti has two functions in the spark process. The first thing that happens is as the cam turns, the optical section of the optispark picks up the signals by the rotation of the shutter wheel. The pulses are sent to the PCM via the optispark electrical harness. The PCM processes the signals along with other sensor input and determines the proper time for the coil to fire. The PCM sends a signal to the Ignition Control Module (ICM) and it, in turn, causes the coil to fire. The spark from the coil travels through the coil wire back to the secondary ignition section of the optispark (cap and rotor), to be distributed to the proper cylinder.
If the opti is never sending the signal to the PCM, the PCM will never send a signal to fire the coil.
Here is some testing you can do. Refer to this diagram.
Disconnect the ICM connector. Leave coil connected.
Turn key to ON.
Check for dc voltage with a digital meter at harness terminal "A" to ground and and also "D" to ground. Note: Use a high impedance meter (at least 10 megohm) when dealing with the PCM.
Result should be 10v dc or more on both terminals. If you get no voltage, use the diagram and chase back toward the coil and the ignition fuse. Power for the ICM comes from the ignition fuse and through the coil, so any of that could be bad.
If you have good voltage, switch the meter to ac scale and connect test leads to terminal "B" and to ground. Observe meter while cranking the engine. You should see between 1 and 4 volts ac (those are the pulses that trigger the coil to fire).
![]()
Pellet Code
Key Resistance in Ohms
Nominal
Low
High
1
402
386
438
2
523
502
564
3
681
654
728
4
887
852
942
5
1130
1085
1195
6
1470
1411
1549
7
1870
1795
1965
8
2370
2275
2485
9
3010
2890
3150
10
3740
3590
3910
11
4750
4560
4960
12
6040
5798
6302
13
7500
7200
7820
14
9530
9149
9931
15
11800
11328
12292
Use a multimeter to check the resistance of the pellet in the key and compare to the table above. Touch the meter leads to each side of the pellet on the metal bar. The nominal reading is the ideal reading. It most likely will be in the range delimited by "low" and "high". There are 15 different key pellets used. Use this information when you need to get a new key made or for finding a resistor if you wish to bypass the system.

edited 1/24/2005
![]()
![]()

![]()
Some people have reported ignition problems that seem to be heat related. One item that can be relieved of some heat stress is the Ignition Control Module (ICM). Merely spacing the coil and ICM bracket away from the cylinder head has solved miss problems in some cases. Any time you can reduce the amount of heat in an electronic component, it will normally prolong it's life and allow for more stable operation.
Getting to the coil and coil replacement is covered elsewhere in my Tech Pages, so I am not going to step through that procedure.
On my 1995 Z, I used a very simple approach to creating some space between the coil bracket and the head. I used some common 3/8" flat washers that I already had laying around. After removing the coil and studs, I put 2 washers between the "stud nut" and the cylinder head on the inboard stud. There is also a bracket for the EVAP hose that goes on this stud to take up some room. I used 3 washers on the outboard stud. With the thickness of the washers I had, this made the distance on each stud approximately the same (approximately 3/16").
The washers are used, because without the coil bracket sandwiched on the stud, the threads would bottom out in the head. This just gives a little extra space, which is not a problem.
Once the washers are in place and the studs screwed back in, you can mount the coil on the outside of the stud nut, instead of the inside where it was before. Torque value for both the stud to head and the nut is 18 lb. ft.
The total gap came out to about 1/2". Note that one of the studs has more threads on the outside portion of the stud nut. This is the stud that goes in the outboard head hole and is longer to accomodate the ground straps attached to it.
Another note: 1993 owners may have a bolt instead of a stud on the inboard side and others may have identical studs on both sides. It really does not matter. The intent is to create an air space between the head and the coil bracket. A little ingenuity and a couple of additional fasteners may be needed.
Tighten up the fasteners and reconnect electrical harnesses and you are done. I don't have any dyno runs or temperature comparisons for before and after, but for next to nothing in cost, this mod can't hurt.
I am not the first one to do this and it could be done using other methods and materials (perhaps, even more effectively). This just happens to be the way I did mine.
Update: At least one person monitored the temperature of the ICM and the head after the mod. With the engine running, the ICM stayed cooler, but when the engine was turned off, the ICM did not dissipate heat as fast as the head did. I did not get any info on how long the ICM stayed hotter. I am just providing that for your information and you can draw your own conclusions.
5/10/2003
![]()
If you have issues you need to track further, a leakdown test will be able to tell you whether rings, valves or head gasket might be leaking.
edited 5/10/2003
![]()
A fuel pressure test gauge can be bought at your local auto supply for ~$35. Attach it to the schrader valve that is on the fuel rail. Schrader valve location on 1994-1997
edited 2/05/2007
![]()
Most people notice that the fuel gauge does not read in a linear fashion. It will stay on the full side for a long time and then once it starts moving, it will drop rapidly. This is due to the shape of the tank and the placement of the float assembly/gauge sender unit. The tank has a bit of a wedge shape to it, that causes there to be more volume in the upper part of the tank than in the lower. The float only reacts to an up and down level and does not compensate for the tank shape.
Locate the pump electrical connector on the rear of the floor pan under the car (above the LH axle tube). It has purple, gray and black wires going toward the fuel tank. Unplug the connector. With a meter set to ohms, read resistance between the black and purple wires going to the tank.
The readings should correspond to your gauge. If the reading(s) seem accurate to what you have in the tank, the sender is ok. If they don't, the sender or wiring from that connector to the sender has a problem.
edited 2/22/2005
![]()
Note that the 1993 IAC has a square electrical connector and the valve screws into the throttle body, instead of being held on by screws like those of later years.
edited 4/15/04
![]()
This is a common fix for when the air no longer blows out the vents. When there is not enough vacuum to operate the actuators, they will only direct air to the floor and defrost ducts by default. Diagram of HVAC system.
edited 4/13/2004
![]()
![]()
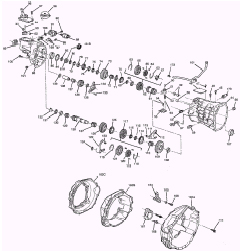
Late model 1998 and up axles used a smaller hub center on the rear axles. Therefore the wheels were made with a smaller hub opening on the back. When you try to swap these wheels onto an earlier model 4th gen, the center of the wheel won't fit over the rear axle hub. The wheel has to be relieved a small amount to allow it to slip on. You can dry fit the wheel to "mark" where the interference is, then you will be able to see the area that needs attention. Use a Dremel, sandpaper or even a half-round file to take of the little bit that is required. It does not have to be perfect, as the wheels are centered by the conical lug nuts, not the hub and that part of the wheel is never visible. Just relieve it enough to get the wheel on/off easily. If you ever intend to rotate your tires, you will want to do this to all four wheels (The fronts will fit without any modification. There are no clearance issues with them). Don't ever try to force the wheel on with the lug nuts. You can strip lug studs and/or get the wheel stuck.
![]()
and is it OBD-I or OBD-II?
1993-1995 LT1 f-body cars have one cat, with the exception being California Emissions (RPO NB6) A4 cars having two. All 1995 M6 cars have one cat.
edited 10/10/2008

Test Model Manufacturer Average Standards
Date Year Engine Family HC/CO/NOx/HyNOx/Evap Code* Status Production
2000
04-Dec 1998 Chrysler .09/1.1/.17/.--/.-- Qe Passed 4,548
WCRXV0195V20
08-Feb 1997 General Motors .18/2.53/.26/.23/.36 T Passed 29,630
VGM5.7HPG1EK
18-Jan 1997 Toyota .14/1.86/.19/.14/.38 Re Passed 15,365
VTY3.42JG2GK
04-Jan 1997 Chrysler .18/3.36/.66/.34/.54 Pb Passed 8,443
VCR14828G1EK
1999
14-Dec 1997 General Motors 2.2L .06/1.24/.32/.16/.47 Qe Passed 26,999
VGM2.2V8G2EK
07-Dec 1997 Ford 5.0L-T .15/2.21/.12/.16/.38 Te Passed 21,625
VFM5.028GFEK
16-Nov 1997 Toyota 2.2L .06/1.05/.14/.04/.22 Vb Passed 44,619
VTY2.2VJG3GK
09-Nov 1997 Volkswagen 2.8L .14/1.15/.20/.04/.27 P Passed 3,442
VVW2.8V8GFGM
02-Nov 1997 Volvo 2.9L .12/1.40/.05/.01/.47 P Passed 2,950
VVV2.9VJGFEL
26-Oct 1997 General Motors 4.3L-T .14/1.68/.27/.12/.-- Te Passed 9,957
VGM4.31PG1EK
19-Oct 1997 Ford 3.0L .05/1.23/.06/.07/.41 Ve Passed 40,567
VFM3.0V8G3EK
12-Oct 1997 Rover 4.0L .26/2.28/.38/.49/.87 Te Failed - Recalled 2,273
VLR4.058GFFK Evaporative System Defects
05-Oct 1997 General Motors 5.0L-T .21/2.1/.26/.21/.2 T Passed 4,622
VGM5.0HPG1EK
28-Sep 1997 Mitsubishi 2.5L .14/1.0/.23/.03/.-- Pe Passed 3,859
VDS2.5VJGKEK
21-Sep 1997 Mercedes 2.3L .06/0.6/.07/.02/.4 Q Passed 5,593
VMB2.3VJGKEK
14-Sep 1997 Chrysler 4.0L-T .06/0.8/.22/.03/.-- Re Passed 13,806
VCR24228G2JK
08-Sep 1997 General Motors 5.7L .17/3.0/.34/.35/.2 P Passed 4,136
VGM5.7V8G1EK
17-Aug 1997 Hyundai 1.8L .20/0.74/.29/.07/.-- Pe Passed 3,479
VHY1.8VJG1EK
10-Aug 1997 Kia 2.0L-T .14/1.50/.15/.08/.-- Se Passed 4,059
VKM2.01JG1EK
03-Aug 1997 Nissan 4.1L .12/1.3/.19/.07/.18 P Passed 4,334
VNS4.1VJG1EK
28-Jul 1997 General Motors 4.3L-T .11/1.7/.28/.20/.-- Rb Passed 14,611
VGM4.32PG2EK
20-Jul 1997 Chrysler 5.9L-T .20/3.40/.35/.13/.21 Tb Passed 12,801
VCR36028G1EK
13-Jul 1997 Honda 1.6L .05/1.78/.09/.04/.24 Vb Passed 41,960
VHN1.6VJG3EK
22-Jun 1997 Ford 5.4L-T .13/1.01/.17/.10/.-- Ub Passed 20,488
VFM5.4J8G1FK
15-Jun 1997 BMW 1.9L .09/0.93/.28/.23/.-- Qe Passed 5,191
VBM1.9VJGKFK
08-Jun 1997 Mazda 1.8L .19/1.41/.22/.04/.22 P Passed 2,822
TTK1.8VJGKEK
In-Use Compliance testing was limited in 2000 due to significant programmatic changes
Page 1
IN-USE VEHICLE COMPLIANCE TESTING SUMMARY Updated 1-21-2001
Test Model Manufacturer Average Standards
Date Year Engine Family HC/CO/NOx/HyNOx/Evap Code* Status Production
25-May 1996 General Motors 4.6L .24/1.89/.27/.08/.31 P Passed 19,651
TGM4.6VJGFEL
18-May 1996 Nissan 3.0L .09/0.92/.31/.13/.66 P Passed 24,399
TNS3.0VJGFEK
11-May 1996 DSM 2.4L .10/1.85/.10/.05/.-- Q Passed 14,606
TDS2.4VJG2EL
04-May 1996 Chrysler 239 T .18/2.52/.23/.12/.62 T Passed 7,316
TCR23928G1EK
27-Apr 1996 Volvo 2.4L .07/0.50/.11/.04/.-- Q Passed 5,364
TVV2.4VJGKEK
13-Apr 1996 Suzuki 1.3L .10/1.68/.09/.01/.-- P Passed 5,686
TSK1.3V5GDFB
06-Apr 1996 Subaru 2.2L .10/1.50/.13/.10/.-- Q Passed 3,362
TFJ2.2VJG2EK
30-Mar 1996 General Motors 2.2L-T .09/1.92/.18/.10/.39 S Passed 15,173
TGM2.218GFEK
16-Mar 1996 Hyundai 1.5L .06/0.87/.06/.07/.23 Q Passed 5,202
THY1.5VJG2FK
09-Mar 1996 Ford 3.0L-T .17/1.58/.37/.26/1.30 S Passed 4,449
TFM3.018G1EK
02-Mar 1996 General Motors 7.4L-T .16/1.61/.44/.19/.22 U Passed 7,637
TGM7.4J8G1EK
23-Feb 1996 Toyota 4.5L-T .24/2.29/.33/.09/.38 T Passed 3,334
TTY4.55JGFEK
09-Feb 1996 Honda 2.7L .16/1.10/.23/.05/.15 P Passed 4,880
THN2.7VJG1EK
02-Feb 1996 Kia 1.8L .13/1.34/.18/.02/.-- P Failed - Recalled 5,095
TKM1.8VJG1EK Evaporative System Defects
26-Jan 1996 General Motors 2.2L .08/1.73/.08/.08/.40 Q Passed 30,217
TGM2.2V8G2EK
19-Jan 1996 Chrysler 318 T .22/3.21/.27/.07/.21 T Passed 13,330
TCR31828G1EL
12-Jan 1996 General Motors 4.3L-T .12/1.69/.29/.11/.40 T Passed 6,606
TGM4.35PGFEK
05-Jan 1996 BMW 2.8L .10/1.73/.27/.10/.-- Q Passed 8,224
TBM2.8VJGKEK
1998
08-Dec 1996 Ford 3.0L .15/1.59/.16/.05/.-- P Passed 13,782
TFM3.0VJG1EK
01-Dec 1996 General Motors 1.9L .10/0.80/.19/.05/.42 Q Passed 11,837
TGM1.9V8G2EK
10-Nov 1996 Mazda 2.0L .10/1.01/.21/.09/.50 Q Failed - Recalled 5,001
TTK2.0VJG2EK Evaporative System Defects
03-Nov 1996 Nissan 2.4L .07/1.16/.22/.22/.28 Q Passed 20,218
TNS2.4VJG2EK
27-Oct 1996 Chrysler 201 .14/1.35/.20/.09/.30 Q Marginal Fail-No Recall 3,017
TCR201V8G2EK
15-Sep 1996 Ford 4.0L-T .07/0.87/.40/.39/.33 R Passed 40,264
TFM4.028G2FK
01-Sep 1996 General Motors 5.7L .16/3.16/.24/.15/.-- P Passed 8,956
TGM5.7V8GFEK
18-Aug 1996 Ford 4.6L .10/1.60/.21/.04/.-- P Passed 8,076
TFM4.6V8G1FK
11-Aug 1996 Toyota 2.7L-T .10/2.31/.14/.08/.26 S Failed - Recall Pending 5,799
TTY2.71HGKEK OBD2 System Defects
04-Aug 1996 General Motors 4.3L-T .13/1.69/.37/.12/2.27 Ti Passed 19,479
TGM4.32PGKEK
Page 2
IN-USE VEHICLE COMPLIANCE TESTING SUMMARY Updated 1-21-2001
Test Model Manufacturer Average Standards
Date Year Engine Family HC/CO/NOx/HyNOx/Evap Code* Status Production
21-Jul 1996 Isuzu 3.2L-T .08/0.92/.32/.04/1.46 R Passed 8,691
TSZ3.22JGKGK
14-Jul 1996 General Motors 4.3L-T .12/1.66/.30/.13/.41 S Passed 6,224
TGM4.31PGFEK
07-Jul 1996 General Motors 4.3L-T .13/1.92/.38/.15/.-- T Passed 20,604
TGM4.32PGKEL
23-Jun 1996 Honda 1.6L .03/1.18/.10/.03/.-- V Passed 31,737
THN1.6VJG3EK
16-Jun 1996 General Motors 3.1L .15/1.51/.23/.14/.-- P Passed 67,216
TGM3.1V8GFEK
09-Jun 1996 Mazda 1.5L .06/0.98/.08/.04/.-- Q Passed 6,138
TTK1.5VJG2EK
02-Jun 1995 General Motors 2.2L-T .14/2.58/.40/.20/.-- S Passed 13,583
S3G2.217G1EA
27-May 1995 Jaguar 4.0L .xx/x.xx/.xx/.xx/.xx P No Decision 5,083
SJC4.0VJGFEK Insufficient Sample
19-May 1995 Nissan 2.4L-T .10/1.27/.23/.12/.-- S Passed 15,802
SNS2.41JGFEA
12-May 1995 Mercedes Benz 3.6L .08/0.95/.14/.02/.31 P Passed 10,142
SMB3.6VJGFEK
05-May 1995 General Motors 5.7L-T .28/5.85/.75/.33/.53 Ui Passed 22,042
S3G5.7J5G1EA
28-Apr 1995 Diamond Star 2.4L .08/1.47/.16/.11/.-- Q Passed 7,675
SDS2.4VJG2EA
21-Apr 1994 General Motors 3.1L .13/1.53/.32/.15/.-- P Passed 65,929
R1G3.1V8GFEA
14-Apr 1995 Ford 1.9L .08/1.69/.26/.10/1.01 Q Passed 51,312
SFM1.9V8G2EA
07-Apr 1995 General Motors 4.3L-T .21/2.94/.65/.64/.-- T Passed 7,690
S3G4.329GFGJ
24-Mar 1995 Volvo 2.4L .13/1.94/.21/.04/.59 P Passed 5,079
SVV2.4VJGFEK
17-Mar 1995 Volkswagen 2.0L .16/2.3/.12/.03/.7 P Passed 13,834
SVW2.0V8GFEA
10-Mar 1995 Chrysler 4.0L-T .15/2.09/.36/.17/.-- T Passed 18,985
SCR24228G1EA
03-Mar 1995 General Motors 5.7L-T .31/4.98/.86/.37/.37 E Passed 11,363
S3G5.7H5G0EA
24-Feb 1995 Isuzu 3.2L-T .30/3.1/.27/.--/.3 T Passed 14,027
SSZ3.22HGKHA
18-Feb 1995 Ford 5.8L-T .08/0.94/.31/.15/.37 T Passed 9,995
SFM5.8H8G1EA
10-Feb 1995 Hyundai 1.5L .16/1.1/.17/.04/.7 P Passed 13,834
SHY1.5VJG1EB
03-Feb 1995 General Motors 1.9L .14/1.61/.26/.15/.77 Q Passed 14,380
S4G1.9V7G2EA
27-Jan 1995 General Motors 4.6L .18/2.11/.24/.16/.42 P Passed 14,632
S1G4.6VJGFEA
21-Jan 1995 Mitsubishi 3.0L-T .09/1.0/.08/.02/.-- R Passed 4,508
SMT3.02JG2EA
13-Jan 1995 General Motors 5.7L-T .26/4.77/.69/.34/.51 Ti Passed 28,835
S3G5.785GBEB
06-Jan 1995 BMW 4.0L .14/0.9/.36/.25/.3 P Passed 7,256
SBM4.0VJGFEA
1997
09-Dec 1995 Suzuki 1.3L .11/2.00/.11/.01/.3 P Passed 5,701
SSK1.3V5GDFA
Page 3
IN-USE VEHICLE COMPLIANCE TESTING SUMMARY Updated 1-21-2001
Test Model Manufacturer Average Standards
Date Year Engine Family HC/CO/NOx/HyNOx/Evap Code* Status Production
02-Dec 1995 General Motors 4.3L-T .40/4.77/.88/.60/.4 E Passed 4,371
S3G4.3H5G0EA
18-Nov 1995 Chrysler 5.9L-T .28/5.40/.58/.20/.8 Ti Passed 6,819
SCR360H8G1FA
11-Nov 1995 Chrysler 2.0L .19/2.70/.27/.08/.3 P Passed 10,788
SCR2.0VJGFEK
04-Nov 1995 Nissan 3.0L .11/2.30/.21/.22/.-- P Passed 38,803
SNS3.0VJG1EK
28-Oct 1995 Ford 3.8L .08/1.20/.19/.07/1.5 P Passed 3,501
SFM3.828G1EK
21-Oct 1995 General Motors 4.3L-T .xx/x.xx/.xx/.xx/.xx T No Decision 7,490
S3G4.329GFEA Insufficient Sample
14-Oct 1995 Kawasaki 500cc MC .71/7.7/.47/.--/.-- Passed 1,400
SKA.50PAGARA Std. .80/12.0 g/km
07-Oct 1995 Honda 1.1MC .90/9.2/.44/.--/.-- Passed 1,086
SHN1.1PAGARD Std. .90/12.0 g/km
30-Sep 1995 Honda 2.2L .10/1.6/.15/.01/.1 P Passed 5,458
SHN2.2VJGKEA
23-Sep 1995 Ford 4.0L-T .10/1.5/.36/35/.-- T Passed 16,532
SFM4.028G1EK
16-Sep 1995 General Motors 4.3L-T .53/7.0/.55/.42/.6 T Passed - CPI Fuel Injector 33,725
S3G4.329GFHB Defect - Extended Warranty
09-Sep 1995 Toyota 2.2L .08/1.10/.22/.05/.3 Q Passed 34,658
STY2.2VJG2GA
22-Jul 1995 Isuzu 3.2L-T .30/3.10/.27/.--/.30 T Passed 14,027
SSZ3.22HGKHA
15-Jul 1995 Mazda 2.0L .11/1.10/.22/.15/.40 Q Passed 10,146
STK2.0VJG2EA
08-Jul 1995 General Motors 3.1L .15/2.10/.35/.17/.20 P Passed 82,333
S1G3.1V8GFEA
08-Jul 1995 General Motors 4.3L-T .19/2.70/.43/.31/.20 S Marginal Failure - No Recall 4,375
S3G4.315GEEA
17-Jun 1994 Ford 3.8L .17/2.10/.12/.09/.10 P Passed 8,190
RFM3.8V8G1EK
03-Jun 1994 General Motors 2.2L-T .27/3.70/.36/.21/.10 N Passed 7,516
R3G2.277GAEA
27-May 1994 Ford 4.6L .15/1.80/.34/.12/.50 P Passed 18,843
RFM4.6V8G1EK
20-May 1994 Volkswagen 2.0L .20/2.80/.19/.06/.50 P Passed 6,090
RVW2.0V8GEFA
13-May 1994 Hyundai 1.8L .30/2.30/.15/.02/.60 P Passed 2,391
RHY1.8VJG1FB
06-May 1994 General Motors 4.3L-T .32/4.90/.40/.11/.70 E Passed 5,383
R3G4.375GAEA
22-Apr 1994 BMW 4.0L .23/1.5/.29/.12/.3 K Passed 4,491
RBM4.0VJGAEA
15-Apr 1994 Toyota 4.5L-T .23/4.2/.85/.90/.3 E Passed 3,652
RTY4.58JGAEA
08-Apr 1994 General Motors 3.1L .18/2.0/.64/.60/.5 P Failed 65,929
R1G3.1V8GFEA "A" Body Vehicles Recalled
21-Mar 1994 Ford 4.0L-T .22/3.1/.45/.25/1.1 O Passed 13,957
RFM4.028G1EA
12-Mar 1994 Suzuki 1.6L-T .14/1.7/.20/.21/.2 S Passed 5,272
RSK1.61JGDHA
04-Mar 1994 General Motors 4.3L-T .35/6.2/.76/.53/.4 E Passed 8,113
R3G4.385GAEB
25-Feb 1994 Honda 1.8L .18/3.1/.18/.08/.2 P Passed 15,942
RHN1.8VJGFEA
Page 4
IN-USE VEHICLE COMPLIANCE TESTING SUMMARY Updated 1-21-2001
Test Model Manufacturer Average Standards
Date Year Engine Family HC/CO/NOx/HyNOx/Evap Code* Status Production
18-Feb 1994 Nissan 2.4L .15/3.1/.24/.08/.5 P Passed 23,788
RNS2.4VJGDEA
04-Feb 1994 General Motors 3.8L-T .12/1.7/.36/.26/.4 R Passed 4,421
R3G3.828G2EA
22-Jan 1994 Mercedes 3.2L .11/1.8/.18/.11/.2 P Passed 6,476
RMB3.2VJGFFA
08-Jan 1994 General Motors 5.7L-T .40/6.8/.84/.54/.3 E Passed 43,468
R3G5.785GAEB
07-Jan 1994 Jaguar 4.0L .29/4.0/.16/.15/.5 P Passed - ECS Defect 2,863
RJC4.0VJGFEK Recalled
1996
10-Dec 1994 Mazda 3.0L-T .20/3.2/.29/.11/.3 O Passed 7,372
RTK3.02HG1EA
03-Dec 1994 Isuzu 3.2L-T .26/2.5/.41/.23/.6 O Passed 9,921
RSZ3.22HGDEA
19-Nov 1994 General Motors 4.3L-T .55/8.40/.46/.39/.30 O Failed - Recall Pending 9,085
R3G4.329GFEA
29-Oct 1994 Chrysler 2.5L .15/3.0/.54/.16/.1 Pi Passed 14,973
RCR2.5V5GEEA
22-Oct 1994 Ford 3.8L .10/1.9/.43/.45/.2 Pi Passed 24,442
RFM3.8V8G1GA
15-Oct 1994 General Motors 3.1L-T .20/5.1/.56/.25/.6 Oi Passed 3,645
R3G3.125GFEA
24-Sep 1994 Mitsubishi 1.5L .15/2.0/.16/.03/.3 P Passed 4,446
RMT1.5VJGFEA
17-Sep 1994 Hyundai 1.5L .14/1.5/.25/.09/.5 P Passed 6,028
RHY1.5V8G1EB
10-Sep 1994 Toyota 2.2L .07/1.1/.29/.11/.10 Q Passed 32,564
RTY2.2VJG2GA
04-Sep 1994 General Motors 5.7L .25/3.8/.44/.53/.4 Ki Passed 5,490
R1G5.7V8GOEB
19-Nov 1994 General Motors 4.3L-T .55/8.4/.46/.39/.3 O Failed - Recall Pending 9,085
R3G4.329GFEA
20-Aug 1993 Harley Davidson 1.3MC .72/10.1/.84/.--/.-- Passed 4,914
EV1340 Std. 1.00/12.0 g/km
13-Aug 1994 General Motors 4.3L-T .49/6.5/.55/.34/.3 O Failed - Recall Pending 13,639
R3G4.389GAEA
06-Aug 1994 General Motors 1.9L .17/2.8/.23/.08/.3 P Passed 10,757
R4G1.9V5GEEA
30-Jul 1994 DSM 2.4L .15/1.9/.34/.12/.3 P Passed 4,521
RDS2.4VJGFEA
23-Jul 1994 Kia 1.6L .19/2.9/.17/.09/.30 P Passed 6,718
RKM1.6VJGEEA
16-Jul 1994 Chrysler 4.0L-T .16/1.7/.45/.22/.80 P/Oi Passed 6,769
RCR24218G1EA
09-Jul 1994 General Motors 4.3L-T .24/4.7/.56/.24/.2 Oi Passed 14,980
R3G4.325G1EA
25-Jun 1994 Nissan 1.6L .18/2.3/.31/.12/.60 P Passed 42,255
RNS1.6VJG1EA
04-Jun 1993 General Motors 4.3L-T .60/9.7/.47/.37/.70 O Failed - Recall Pending 9,750
P3G4.3XBXE33
21-May 1993 Mazda 2.5L .24/4.6/.20/.03/.5 K Passed 4,418
PTK2.5V5FCL4
14-May 1993 BMW 1.8L .14/1.4/.21/.19/.4 K Passed 4,069
PBM1.8V5F421
07-May 1993 General Motors 3.1L .16/2.5/.34/.28/.2 P Passed 9,750
P1G3.1W8MCF5
Page 5
IN-USE VEHICLE COMPLIANCE TESTING SUMMARY Updated 1-21-2001
Test Model Manufacturer Average Standards
Date Year Engine Family HC/CO/NOx/HyNOx/Evap Code* Status Production
30-Apr 1993 Isuzu 1.6L .16/3.1/.13/.10/.40 P Passed 3,108
PSZ1.6V5FHE1
23-Apr 1993 Suzuki 750cc MC 1.16/9.45/.--/--/-- Passed 1,440
NSK074844S2 Std. 1.6/12.0 g/km
16-Apr 1993 Ford 4.0L-T .10/1.9/.20/.06/1.6 O Passed 49,027
PFM4.0T5FCC6
09-Apr 1993 Ford 1.9L .10/2.5/.30/.09/1.0 Q Passed 49,276
PFM1.9V5FCC2
02-Apr 1993 General Motors 2.0L .13/3.4/.18/.08/.4 P Passed 10,096
P1G2.0W8JF15
26-Mar 1993 Honda 2.2L .09/2.1/.17/.05/.4 P Passed 26,621
PHN2.2V5FPZ0
19-Mar 1992 Kawasaki 500cc MC .45/8.8/.--/.--/.-- Passed 1,600
NKA049842A7 Std. 0.80/12.0 g/km
12-Mar 1993 Volvo 2.3L .11/2.9/.10/.07/.4 P Passed 3,920
PVV2.3V5FP88
05-Mar 1993 General Motors 1.9L .25/4.3/.18/.07/1.1 K Passed 17,503
P4G1.9W8JPD9
27-Feb 1993 Mitsubishi 1.5L .17/2.5/.21/.07/.3 P Passed 3,508
PMT1.5V5FC45
20-Feb 1993 Hyundai 1.8L .32/4.0/.35/.09/.5 K Passed 1,728
PHY1.8V5FC49
13-Feb 1993 General Motors 4.9L .20/4.6/.56/.45/.3 Ki Marginal Fail - No Recall 16,684
P1G4.9W8XTAX
06-Feb 1993 General Motors 1.9L .16/3.1/.30/.07/.4 P Passed 9,435
P4G1.9W5J817
30-Jan 1993 Mercedes 5.0L .18/2.8/.14/.06/.3 P Passed 5,218
PMB5.0V5FA12
16-Jan 1993 Ford 4.6L .17/4.7/.41/.36/.2 Ki Passed 22,280
PFM4.6V5FDCX
09-Jan 1993 Ford 2.3L .14/4.2/.30/.24/1.1 N Passed 12,489
PFM2.3T5FMLX
03-Jan 1993 General Motors 5.7L-T .61/7.5/1.11/.63/.5 E Failed - Recall Pending 38,002
P3G5.7T5TYA8
1995
12-Dec 1993 Suzuki 1.0L .13/2.2/.25/.07/.4 K Passed 7,959
PSK1.0V5FFC6
05-Dec 1993 General Motors 4.3L-T .20/3.1/.97/.75/.6 O Passed 16,444
P3G4.3X5XG38
28-Nov 1993 Chrysler 215 .31/3.1/.46/.15/.5 Ki Passed 5,219
PCR215V5FPG2
14-Nov 1993 Nissan 2.4L .15/2.2/.29/.19/.7 P Passed 14,554
PNS2.4V5FBC5
07-Nov 1993 General Motors 4.3L-T .97/15.6/.90/.56/.3 E Failed - Recalled 5,280
P3G4.3TBTAB6
31-Oct 1993 General Motors 2.3L .06/0.9/.29/.13/.5 Q Passed 10,746
P1G2.3W8MAY7
24-Oct 1993 Chrysler 153 .10/2.7/.28/.10/.3 P Passed 9,773
PCR153V5FEN4
17-Oct 1993 Range Rover 4.2L .17/2.4/.63/1.19/1.3 E Passed 1,691
PLR4.2T5FSS8
10-Oct 1993 Mazda 2.0L .14/1.6/.25/.06/.6 P Passed 4,704
PTK2.0V5FWL2
03-Oct 1993 General Motors 4.3L-T .27/3.4/.33/.27/.5 N Passed 4,167
P3G4.3T5XEB5
26-Sep 1993 Ford 3.8L .10/1.4/.27/.21/.2 P Passed 30,175
PFM3.8V5FAC8
Page 6
IN-USE VEHICLE COMPLIANCE TESTING SUMMARY Updated 1-21-2001
Test Model Manufacturer Average Standards
Date Year Engine Family HC/CO/NOx/HyNOx/Evap Code* Status Production
19-Sep 1993 Toyota 1.8L .16/3.1/.37/.17/.1 P Passed 12,399
PTY1.8V5FCD3
12-Sep 1993 Volkswagen 2.0L .17/2.9/.26/.15/.8 P Passed 5,857
PVW2.0V5FWA1
06-Sep 1993 General Motors 4.3L-T .57/8.1/.94/.30/.4 E Failed - Recall Pending 11,431
P3G4.3T5TAA6
22-Aug 1993 Nissan 1.6L .15/2.1/.32/.14/.7 P Passed 24,363
PNS1.6V5FAA5
15-Aug 1993 Ford 4.9L-T .35/3.1/.60/.79/.4 E Passed 5,543
PFM4.9T5HGL8.2M
08-Aug 1993 Ford 2.0L .15/1.7/.23/.07/.3 P Passed 5,344
PFM2.0V5FXC8
01-Aug 1993 Chrysler 4.0L-T .23/2.6/.26/.20/.4 O/N Passed 15,743
PCR242T5FKY8.2M
25-Jul 1993 Chrysler 3.0L-T .17/1.4/.34/.20/.1 O Passed 17,047
PCR181T5FJV6.2
18-Jul 1992 Honda 600cc MC .68/9.1/.--/.--/.-- Passed 4,445
NHN060044F4 Std. 1.1/12.0 g/km
18-Jul 1992 Isuzu 3.1L-T .46/10.1/.58/.--/.-- E Failed - Recall Pending 6,789
NSZ3.1T5FKB4
11-Jul 1993 Honda 1.5L .13/2.0/.26/.14/.2 K/P Passed 33,166
PHN1.5V5FDC9
27-Jun 1993 Isuzu 3.2L-T .29/4.0/.40/.69/.4 O Passed 4,380
PSZ3.2T5FHF6
20-Jun 1993 BMW 2.5L .15/1.9/.17/.12/.5 K Passed 13,508
PBM2.5V5FT1X
13-Jun 1993 Hyundai 1.5L .16/1.6/.17/.03/.5 P Passed 5,619
PHY1.5V5FCAX
23-May 1992 Toyota 3.0L .14/1.3/.32/.13/.5 K Passed 14,856
NTY3.0V5FCV3
16-May 1992 Suzuki 1.6L-T .13/4.4/.16/.02/.4 M Passed 3,341
NSK1.6T5FCC8
15-May 1992 General Motors 4.3L-T .27/3.6/.76/.--/.-- N Failed - Recall Pending 12,400
N3G4.3TBXEB2
09-May 1992 Mazda 1.6L .16/2.3/.24/.19/.4 K Passed 5,984
NTK1.6V5FCSX
02-May 1992 Ford 4.0L-T .12/2.6/.34/.13/1.8 E Passed 50,492
NFM4.0T5FAM1
18-Apr 1992 Volvo 2.3L .15/2.00/.17/.08/.5 F Passed 6,687
NVV2.3V5FE82
11-Apr 1992 General Motors 5.7L .24/3.20/.33/.11/1.7 K Passed 6,439
N1G5.7V5XEA2
04-Apr 1992 Nissan 2.4L-T .34/3.40/.21/.08/.70 N Passed 12,275
NNS2.4T5FCC6
21-Mar 1992 Honda 2.5L .17/2.20/.16/.04/.30 K Passed 5,002
NHN2.5V5FHC1
14-Mar 1992 General Motors 4.3L-T .24/3.00/.69/.--/.-- E Passed 3,190
N3G4.3TBXEB2 (>3751lbs)
07-Mar 1992 Chrysler 3.9L-T .24/2.50/.49/.36/.50 E Passed 4,989
NCR3.9T5FGX0
21-Feb 1992 Hyundai 1.6L .41/3.40/.30/.09/.60 F Passed 3,517
NHY1.6V5FCA3
14-Feb 1992 Toyota 2.4L-T .10/1.20/.19/.10/.30 N Passed 11,267
NNT2.4T5FCC7
07-Feb 1992 Suzuki 1.0L .25/3.10/.20/.07/.50 F Passed 14,976
NSK1.0V5FFC4
17-Jan 1992 General Motors 5.7L-T .65/9.70/1.25/.--/.-- Li Marginal Failure 3,677
N3G5.7T5TYA6 (>3751lbs) No Recall
Page 7
IN-USE VEHICLE COMPLIANCE TESTING SUMMARY Updated 1-21-2001
Test Model Manufacturer Average Standards
Date Year Engine Family HC/CO/NOx/HyNOx/Evap Code* Status Production
17-Jan 1992 General Motors 5.7L-T .66/9.40/1.13/.60/.40 E Failed - Recalled 26,534
N3G5.7T5TYA6
10-Jan 1992 BMW 2.5L .18/1.90/.26/.18/.30 K Passed 6,314
NBM2.5V5F500
04-Jan 1992 General Motors 1.9L .44/5.10/.36/.27/.60 K Marginal Failure 10,297
N4G1.9V8JPD2 No Recall
1994
07-Dec 1992 Mitsubishi .27/2.7/.29/.07/.70 K Passed 2,954
NMT3.0V5FC29
06-Dec 1992 Toyota 2.2L .13/1.9/.25/.06/.10 O Passed 22,503
NTY2.2V5FCE7
15-Nov 1992 Isuzu 1.6L .24/4.2/.31/.05/.60 F Passed 5,476
NSZ1.6V5FCE0
08-Nov 1992 Chrysler 2.5L-T .20/5.70/.17/.02/.60 N Passed 4,081
NCR150T5FDV5
07-Nov 1992 Mitsubishi 2.4L-T .19/3.2/.20/.22/.50 N Passed 4,228
NMT2.4T5FC13
25-Oct 1992 Mitsubishi 1.8L .19/1.7/.26/.20/.50 K Passed 3,696
NDS1.8V5FC19
18-Oct 1992 General Motors 2.2L .20/3.4/.24/.07/.50 K Passed 5,756
N1G2.2W8JFGX
11-Oct 1992 General Motors 4.3L-T .65/7.2/1.25/.72/.40 E Failed - Recalled 26,677
N3G4.3TBTAA3
04-Oct 1992 Mazda 3.0L-T .28/5.0/.25/.06/.44 E Passed 9,495
NTK3.0T5FCC3
20-Sep 1992 Mercedes 5.0L .23/1.8/.20/.04/.30 F Passed 4,628
NMB5.0V5FA10
13-Sep 1992 Nissan 2.4L .18/3.3/.18/.04/.59 K Passed 6,635
NNS2.4V5FAAX
06-Sep 1992 Honda 1.8L .26/5.5/.23/.09/.24 K Passed 9,869
NHN1.8V5FXC9
23-Aug 1992 General Motors 4.3L-T .25/3.7/.59/.46/1.10 O Passed 5,236
N3G4.3TBXE31
23-Aug 1992 General Motors 4.3L-T .27/4.4/.71/.27/.42 N Failed - Recall Pending 18,474
N3G4.3TBXEB2
09-Aug 1992 Chrysler 5.2L-T .27/6.2/.59/.49/1.07 E Passed 6,393
NCR5.2T5FHB4
02-Aug 1992 Chrysler 4.0L-T .20/3.6/.20/.15/.90 N Passed 16,578
NCR242T5FEFX
26-Jul 1992 Ford 1.9L .12/2.80/.23/.08/1.3 K Passed 16,681
NFM1.9V5FCC0
26-Jul 1992 Ford 4.9L-T .39/2.50/.74/.89/.40 E Passed 10,040
NFM4.9T5HGL6
19-Jul 1992 Volkswagen 1.8L .20/3.5/.47/.56/.68 F Passed 7,531
NVW1.8V5GWM9
12-Jul 1992 Ford 5.8L-T .23/2.20/.73/.65/.70 E Passed 22,116
NFM5.8T5HAL7
12-Jul 1992 Ford 2.3L-T .34/4.40/.35/.12/.80 N Passed 12,366
NFM2.3T5FML8
06-Jul 1992 Hyundai 1.5L .28/3.1/.20/.09/.51 F Passed 7,018
NHY1.5V5FCA8
21-Jun 1992 Ford 3.8L .16/1.90/.19/.03/1.2 K Passed 40,930
NFM3.8V5FJC6
21-Jun 1992 Ford 2.3L .16/2.10/.10/.02/.20 K Passed 5,904
NFM2.3V5FYC4
20-Jun 1992 Isuzu 3.1L-T .49/12.5/.67/.49/.89 E Failed - Recall Pending 6,789
NSZ3.1T5FKB4
Page 8
IN-USE VEHICLE COMPLIANCE TESTING SUMMARY Updated 1-21-2001
Test Model Manufacturer Average Standards
Date Year Engine Family HC/CO/NOx/HyNOx/Evap Code* Status Production
14-Jun 1991 Chrysler 2.5L-T .19/6.1/.16/.05/.62 N Passed 5,267
MCR150T5FDV4
07-Jun 1991 General Motors 3.8L .15/2.6/.21/.12/.68 K Passed 4,000
M2G3.8W8JAW8
24-May 1991 Chrysler 3.3L-T .31/4.1/.56/.xx/.36 E Passed 21,632
MCR3.3T5FBRX
10-May 1991 General Motors 4.3L-T .72/8.1/.83/.37/.53 E Failed - Recalled 17,855
M3G4.3T5TAA3
02-May 1991 Ford 2.3L .19/4.3/.35/.18/.30 K Passed 28,558
MFM2.3V5FWCX
26-Apr 1991 Ford 4.0L-T .19/3.60/.43/.24/1.7 E Passed 7,979
MFM4.0T5FACX
19-Apr 1991 Ford 5.8L-T .37/5.9/.86/.66/.49 E Passed 19,863
MFM5.8T5HAL6
12-Apr 1991 Chrysler 5.9L-T .42/4.1/.86/.78/.53 E Passed 8,145
MCR5.9T5HGD7
05-Apr 1991 General Motors 4.9L .27/6.0/.37/.20/.33 K Passed 23,813
M2G4.9W8XTA6
21-Mar 1991 BMW 1.8L .20/2.2/.19/.06/.27 K Passed 5,546
MBM1.8V5F4V1
14-Mar 1991 Toyota 3.0L-T .18/2.3/.25/.12/.30 E Passed 20,219
MTY3.0T5FBE1
07-Mar 1991 Mercedes 3.0L .12/1.40/.12/.16/.63 F Passed 9,049
MMB3.0V6FA19
01-Mar 1991 Mitsubishi 2.4L-T .20/2.80/.21/.47/.54 N Passed 6,726
MMT2.4T5FC12
22-Feb 1991 Ford 2.2L .16/2.90/.13/.02/.28 K Passed 4,891
MFM2.2V5FZCX
15-Feb 1991 Ford 4.0L-T .18/3.40/.31/.30/1.6 E Passed 42,893
MFM4.0T5FAM0
08-Feb 1991 Ford 2.3L-T .25/3.60/.26/.13/1.00 N Passed 7,008
MFM2.3T5FML7
25-Jan 1991 Mitsubishi 1.5L .26/2.40/.29/.05/.57 K Passed 9,376
MMT1.5V5FC42
18-Jan 1991 Volvo 2.3L .21/2.40/.18/.05/.60 F Passed 7,957
MVV2.3V5FE81
11-Jan 1991 Mazda 1.6L .25/2.90/.31/.22/.22 K Passed 8,213
MTK1.6V5FCS9
04-Jan 1991 Isuzu 1.6L .23/3.70/.21/.33/.24 F Passed 9,141
MSZ1.6V5FCEX
1993
07-Dec 1991 Nissan 1.6L .21/4.50/.27/.06/.67 K Passed 27,337
MNS1.6V5FAA2
30-Nov 1991 Mitsubishi 3.0L .23/2.70/.67/.69/5.16 G Failed - Recalled 3,219
MMT3.0V5FC28
16-Nov 1991 Toyota 2.5L .16/1.40/.26/.10/.25 K Passed 17,605
MTY2.5V5FCC0
09-Nov 1991 Saab 2.3L .21/2.30/.22/.18/1.78 F Passed 2,036
MSA2.3V5FNA5
02-Nov 1991 Chrysler 4.0L-T .26/4.50/.19/.17/.59 N Passed - Evaporative System 22,279
MCR242T5FEF9 Defects - Recalled
26-Oct 1991 Honda 1.6L .23/3.70/.40/.42/.24 K Passed 6,825
MHN1.6V5FVC3
19-Oct 1991 Ford 1.9L .15/3.30/.21/.23/1.00 K Passed 38,725
MFM1.9V5FAC6
12-Oct 1991 Ford 3.8L .16/3.30/.27/.11/.13 K Passed 33,593
MFM3.8V5FXC6
Page 9
IN-USE VEHICLE COMPLIANCE TESTING SUMMARY Updated 1-21-2001
Test Model Manufacturer Average Standards
Date Year Engine Family HC/CO/NOx/HyNOx/Evap Code* Status Production
05-Oct 1991 Ford 4.6L .21/4.50/.36/.43/.56 K Passed 14,259
MFM4.6V5FDC7
28-Sep 1991 Ford 5.0L .22/1.90/.38/.11/1.75 K Passed 5,772
MFM5.0V5HBH8
21-Sep 1991 Hyundai 1.5L .28/2.39/.21/.07/.18 K Passed 14,425
MHY1.5V5FCA7
14-Sep 1991 Nissan 2.4L .18/3.30/.24/.06/.70 K Passed 7,627
MNS2.4V5FAA9
07-Sep 1991 General Motors 4.3L-T .47/9.10/.34/.--/.-- E Marginal Failure - No Recall 30,740
M3G4.3T5XEB2 (>3751lbs)
07-Sep 1991 General Motors 4.3L-T .53/10.8/.27/.08/.32 N No Decision 30,740
M3G4.3T5XEB2 (<3751lbs)
31-Aug 1991 VW 1.8L .25/3.30/.40/.24/.38 F Passed 6,103
MVW1.8V5FWM8
17-Aug 1990 General Motors 4.3L-T .64/7.70/.91/.50/.44 E No Decision 20,202
L3G4.3T5TAA2
03-Aug 1990 Chrysler 2.2/2.5L .19/5.50/.30/.12/.99 K Passed 16,688
LCR2.5V5FCEX
20-Jul 1991 Ford 1.8L .21/2.40/.40/.28/.72 K Passed 9,297
MFM1.8V5FXC1
13-Jul 1991 Ford 5.0L .16/3.30/.18/.06/1.73 A Passed 4,637
MFM5.0V5FXC7
06-Jul 1991 Suzuki 1.0L .28/3.70/.18/.05/.59 F Passed 10,541
MSK1.0V5FFC3
22-Jun 1990 Mazda 3.0L-T .25/9.90/.42/.20/.29 E Passed 9,819
LTK3.0T5FCC1
15-Jun 1990 Isuzu 1.6L .29/4.80/.29/.19/.22 F Passed 10,264
LSZ1.6V5FHA4
07-Jun 1990 General Motors 3.1L .33/4.70/.30/.14/.44 K Passed 43,822
L1G3.1W8XGZX
01-Jun 1990 General Motors 2.2L .20/4.00/.40/.15/.47 K Passed 19,828
L1G2.2W5JFG7
24-May 1990 NUMMI 1.6L .15/1.20/.18/.10/.18 K Passed 16,030
LNT1.6V5FCD6
18-May 1990 Ford 3.0L .35/6.70/.52/.24/.18 K Passed 9,255
LFM3.0V5FXD2
10-May 1990 Honda 2.2L .16/2.90/.21/.05/.19 K Passed 29,342
LHN2.2V5FFCX
29-Jun 1990 Mitsubishi 2.0L .24/2.80/.22/.20/1.42 K Passed 6,751
LMT2.0V5FC19
03-May 1990 Ford 5.8L-T .53/7.20/.78/.41/.70 E Marginal Fail-No Recall 28,080
LFM5.8T5HAC5
26-Apr 1990 Toyota 4.0L .16/1.20/.22/.04/.45 K Passed 11,985
LTY4.0V5FCC7
19-Apr 1990 Ford 3.8L .20/4.10/.31/.08/.15 K Passed 6,194
LFM3.8V5FFC3
13-Apr 1990 Mitsubishi 1.5L .23/2.35/.23/.16/.34 F Passed 4,422
LMT1.5V5FC19
12-Apr 1990 Mazda 1.8L .23/2.90/.34/.11/.18 K Passed 4,156
LTK1.8V5FCE1
05-Apr 1990 BMW 2.5L .23/3.50/.19/.07/.35 F Passed 4,422
LBM2.5V5F35X
29-Mar 1990 AMC (Chry) 4.0L-T .30/5.10/.28/.12/.72 C Passed- ECS Defects 4,439
LAM242T5LND9 Recalled
15-Mar 1990 General Motors 4.3L-T .64/14.4/.35/.13/.30 E/N No Decision 9,262
L3G4.3T5XEB1
22-Mar 1990 General Motors 4.5L .37/7.30/.49/.22/.22 K Marginal Fail-No Recall 27,209
L2G4.5W8X5G2
Page 10
IN-USE VEHICLE COMPLIANCE TESTING SUMMARY Updated 1-21-2001
Test Model Manufacturer Average Standards
Date Year Engine Family HC/CO/NOx/HyNOx/Evap Code* Status Production
02-Mar 1990 Diamond Star 1.8L .22/1.76/.18/.07/.40 K Passed 8,424
LDS1.8V5FC17
01-Mar 1990 Nissan 3.0L-T .20/2.10/.56/1.30/.66 E Passed 5,478
LNS3.0T5FDC1
23-Feb 1990 Ford 2.9L-T .30/4.00/.24/.15/--- C Passed 12,595
LFM2.9T5FRD9
22-Feb 1990 Subaru 2.2L .17/2.00/.36/.22/.23 F Passed 7,654
LFJ2.2V5FCD4
08-Feb 1990 Mitsubishi 2.4L-T .19/3.00/.33/.23/.44 C Passed 6,043
LMT2.4T5FC11
01-Feb 1990 Ford 5.0L .39/1.40/.90/---/.21 G Passed 11,941
LFM5.0V5HBG6
20-Jan 1990 Ford 3.8L .30/3.00/.33/.21/1.96 K Passed 8,708
LFM3.8V5FAC4
12-Jan 1990 Chrysler 5.9L-T .49/4.50/1.19/1.33/.42 E Failed-Recalled 12,616
LCR5.9T5HGD6
04-Jan 1990 AMC (Chry) 4.2L-T .52/13.35/.70/.64/1.45 C Failed-Recalled 22,064
LAM258T2HEA8
1992
14-Dec 1990 Toyota 2.4L-T .10/1.30/.25/.12/.23 N Passed 20,924
LTY2.4T5FCC5
01-Dec 1990 Diamond Star 2.0L .24/3.32/.43/.35/.66 K Passed 8,371
LDS2.0V5FC21
30-Nov 1990 Hyundai 1.5L .39/3.81/.22/.10/.31 F Passed 16,779
LHY1.5V5FCA6
16-Nov 1990 Nissan 2.4 .18/3.84/.28/.06/.79 K Passed 9,593
LNS2.4V5FACX
02-Nov 1990 General Motors 2.0L .19/3.20/.39/.14/.55 K Passed 5,270
L1G2.0W5JFH7
02-Nov 1990 Ford 1.9L .17/6.10/.52/.27/.xx K Passed 11,741
LFM1.9V5FFH9
26-Oct 1990 Chrysler 3.3L .32/3.84/.55/.26/.45 K Passed 10,315
LCR3.3V5FCF7
19-Oct 1990 Ford 4.0L-T .17/4.36/.42/.00/1.68 E Passed 10,315
LFM4.0T5FAC9
13-Oct 1989 General Motors 5.7L .29/2.12/.55/.xx/.64 G Passed-Evap. Defects 4,501
K1G5.7V8DCA9 Recalled
28-Sep 1989 AMC (Chry) 2.5L-T .29/8.81/.69/.--/.51 C Failed-Recalled 4,441
KAM150T5LAD9
08-Sep 1990 Ford 2.3L .23/4.98/.28/.14/.17 K Passed 26,227
LFM2.3V5FXC0
24-Aug 1990 Ford 1.9L .25/6.76/.67/.30/.23 K Failed-Recalled 19,900
LFM1.9V5FFC4
27-Jul 1990 Ford 2.3L-T .30/6.25/.32/.34/1.41 N Passed 9,061
LFM2.3T5FMC6
13-Jul 1990 Ford 1.9L (GT) .34/3.77/.85/.56/.27 A Failed-Recalled 5,461
LFM1.9V5HMC6
03-Feb 1989 Mitsubishi 2.0L .22/2.14/.19/.05/1.29 K Passed 7,618
KMT2.0V5FC18
27-Jan 1989 Mitsubishi 2.0L-T .23/3.88/.78/1.17/.83 C Passed 9,171
KMT2.0T2FB16
06-Jan 1989 BMW 2.5L .26/2.71/.20/.10/.73 B Passed 15,000
KBM2.5V5F359
1991
02-Dec 1989 Ford 2.9L-T .25/5.79/.26/.23/.18 N Passed 18,467
KFM2.9T5FRD8
Page 11
IN-USE VEHICLE COMPLIANCE TESTING SUMMARY Updated 1-21-2001
Test Model Manufacturer Average Standards
Date Year Engine Family HC/CO/NOx/HyNOx/Evap Code* Status Production
12-Nov 1989 Ford 3.8L .34/3.84/.27/.06/- K Passed 35,933
KFM3.8V5FFC2
21-Oct 1989 Volvo .21/2.43/.19/.08/.71 F Passed 15,762
KVV2.3V5FE8X
10-Oct 1989 Isuzu 2.6L-T .37/7.24/.39/.35/.33 M Passed 4,243
KSZ156T5FGA8
30-Sep 1989 General Motors 3.8L .19/1.65/.23/.10/.27 F Passed 30,453
K3G3.8W8XEB6
19-Sep 1989 General Motors 7.4L-T .28/8.26/.75/.34/.60 L Passed 10,926
KGC7.4T5HAC8
19-Sep 1989 Ford 5.8L-T .41/4.04/.82/1.58/.66 E Passed 16,542
KFM5.8T5HAC4
09-Sep 1989 Ford 1.6L .15/3.74/.27/.09/.14 A Passed 6,515
KFM1.6V5FXC9
29-Aug 1989 Ford 2.9L-T .26/6.27/.26/.38/.75 E Passed 8,510
KFM2.9T5FRC7
19-Aug 1989 Ford 2.2L .23/4.88/.14/.01/.26 K Passed 4,685
KFM2.2V5FXC4
08-Aug 1989 Ford 3.8L .37/3.43/.38/.44/1.82 K Passed 25,012
KFM3.8V5FAC3
29-Jul 1989 Ford 3.0L .28/4.50/.52/.28/.49 C Passed 30,118
KFM3.0V5FED8
18-Jul 1989 Hyundai 2.4L .29/2.86/.25/.10/.74 F Passed 8,075
KHY2.4V5FCDX
08-Jul 1989 Toyota 2.2L-T .16/2.75/.44/.35/.34 C Passed 4,443
KTY2.2T5FBB0
24-Jun 1988 Chrysler 2.2L .25/4.06/.48/.35/.30 A Passed 11,025
JCR2.2V5FAD7
13-Jun 1989 AMC (Chry) 4.0L-T .41/7.33/.37/.39/1.11 C Marginal Fail-No Recall 30,032
KAM242T5LND8
03-Jun 1988 Honda 1.5L .15/3.29/.61/.37/.20 A Passed 32,991
JHN1.5V5FDC3
23-May 1988 Ford 3.0L-T .28/6.08/.46/.19/1.82 C Passed 21,182
JFM3.0T5FEC7
13-May 1988 Ford 2.9L-T .39/6.76/.43/.55/.45 C Passed 25,318
JFM2.9T5FRC6
02-May 1988 Ford 2.3L .30/4.24/.34/.44/.30 A Passed 5,144
JFM2.3V5FGK8
22-Apr 1988 Chrysler 3.0L .38/2.85/.41/.25/.45 A Passed 9,487
JCR3.0V5FBRX
26-Mar 1988 General Motors 2.8L-T .39/9.13/.44/.28/.52 E Marginal Fail-No Recall 8,865
J3G2.8T5XAS5
21-Mar 1988 Nissan 1.6L .21/4.43/.32/.06/.68 A Passed 28,350
JNS1.6V5FDC7
12-Mar 1988 Volkswagen 1.8L .21/1.84/.41/.21/.86 B Passed 15,017
JVW1.8V6F9A1
28-Feb 1988 Ford 1.9L .24/6.80/.78/.34/.27 A Marginal Fail-No Recall 30,140
JFM1.9V5FFC2
19-Feb 1988 Ford 2.3L-T .54/5.53/.72/.30/.23 E Failed-Recalled 21,955
JFM2.3T5FFG1
06-Feb 1988 Ford 3.8L .39/2.52/1.16/.80/3.78 A Failed-Recalled 17,999
JFM3.8V5FFC1
28-Jan 1988 Mitsubishi 1.5L .29/6.22/.48/.08/.91 A Passed 12,461
JMT1.5V2FCC8
16-Jan 1988 General Motors 4.3L-T .42/5.42/.93/.41/.50 E Passed 18,028
J3G4.3T5TAA0
Page 12
IN-USE VEHICLE COMPLIANCE TESTING SUMMARY Updated 1-21-2001
Test Model Manufacturer Average Standards
Date Year Engine Family HC/CO/NOx/HyNOx/Evap Code* Status Production
07-Jan 1988 BMW 2.7L .30/2.99/.23/.22/.57 B Passed 19,226
JBM2.7V5F359
1990
10-Dec 1988 Toyota 1.5L .22/3.77/.37/.11/.40 A Passed 20,947
JTY1.5V1FCC6
26-Nov 1988 Ford 1.9L .37/3.50/.98/.72/.24 A Failed-Recalled 11,218
JFM1.9V5HMK3
13-Nov 1988 Ford 2.3L .28/3.71/.88/.62/.38 A Failed-Recalled 32,094
JFM2.3V5HEH5
29-Oct 1988 Jaguar 3.6L .18/2.68/.28/.19/.73 B Passed 4,667
JJR3.6V5FLH5
18-Oct 1988 Mercedes 3.0L .31/3.0/.29/.15/.3 B Passed 8,123
JMB3.0V6FA16
09-Oct 1988 Mitsubishi 2.6L-T .24/7.03/.56/.77/1.21 C Passed 9,196
JMT2.6T2FBCX
26-Sep 1988 General Motors 2.3L .17/1.87/.26/.14/.29 A Passed 7,807
J2G2.3W8XEW4
19-Sep 1988 AMC (Chry) 4.0L-T .28/4.96/2.47/3.32/1.21 C Failed-Recalled 25,051
JAM242T5LND7
10-Sep 1988 Chrysler 3.9L-T .43/3.26/.79/.39/.70 J Passed 6,524
JCR3.9T5HFM8
30-Aug 1988 Daihatsu 1.0L .20/3.44/.26/.25/.29 F Passed 5,172
JDH1.0V5FCB1
27-Aug 1988 Suzuki 1.3L-T .18/5.40/.55/.86/1.03 I Passed 80,142
JSK1.3T2FFC7
09-Aug 1988 Isuzu 2.6L-T .34/7.33/.84/1.08/.38 E Passed 6,186
JSZ156T5FBB9
31-Jul 1988 Ford 1.3L .15/2.88/.60/.50/1.18 A Passed-EGR Sensor Defect 16,313
JFM1.3V2FZC4 Recalled
23-Jul 1988 Ford 5.8L-T .48/6.09/.79/1.10/.55 E Passed 22,919
JFM5.8T5HAC3
09-Jul 1988 Mazda 2.2L .15/2.39/.21/.03/.20 A Passed 12,433
JTK2.2V5FCH7
28-Jun 1988 Mitsubishi 2.0L-T .30/3.78/.77/1.26/.88 C Passed 20,355
JMT2.0T2FBC7
20-Jun 1988 Yugo 1.3L .xx/x.xx/.xx/.xx/.xx B No Decision 11,425
JYA1.3V2GAA4 Insufficient Sample
11-Jun 1988 Hyundai 1.5L .23/6.63/.24/.10/.58 B Passed 83,072
JHY1.5V2FCB4
31-May 1987 General Motors 5.7L-T .41/3.42/.79/.48/.67 E Passed 16,369
H3G5.7T5TYA9
21-May 1987 General Motors 5.0L .27/3.87/.58/.41/1.34 A Passed 13,999
H2G5.0W4NBA6
10-May 1987 Chrysler 2.6L-T .21/7.89/.92/1.13/1.65 C Passed 9,032
HCR2.6T2BAP7
30-Apr 1987 BMW 2.5L .34/2.72/.29/.27/.78 B Passed 13,255
HBM2.5V5F354
19-Apr 1987 BMW 3.4L .29/3.59/.44/.18/1.98 B Passed 6,505
HBM3.4V5F571
09-Apr 1987 Nissan 3.0L .32/2.61/.57/.29/.90 A Passed 38,082
HNS3.0V5FACX
29-Mar 1987 Toyota 3.0L .19/1.52/.40/.07/.22 A Passed 6,460
HTY3.0V5FBB1
19-Mar 1987 Ford 2.3L .61/5.06/.68/.48/.14 A Failed-Recalled 6,889
HFM2.3V5FFG7
13-Mar 1987 Ford 5.0L-T .44/3.16/.91/1.82/.62 E Passed-Evap Defect 17,361
HFM5.0T5HAGX Recalled
Page 13
IN-USE VEHICLE COMPLIANCE TESTING SUMMARY Updated 1-21-2001
Test Model Manufacturer Average Standards
Date Year Engine Family HC/CO/NOx/HyNOx/Evap Code* Status Production
26-Feb 1987 Mitsubishi 2.4L-T .30/2.05/.69/.74/3.33 C Failed-Recalled 8,094
HMT2.4T5FBD7
13-Feb 1987 Volkswagen 1.8L .15/1.64/.25/.10/.93 B Passed 11,594
HVW1.8V6FAC5
01-Feb 1987 Subaru 1.8L-T .20/3.24/.33/.16/.32 D Passed-Cat Defect 5,878
HFJ1.8T5HCR5 Recalled
18-Jan 1987 AMC (Chry) 4.2L-T .56/9.31/1.37/1.01/1.43 C Failed-Recalled 5,022
HAM258T2HEA2
03-Jan 1987 Chrysler 3.9L-T .41/6.74/.82/.57/1.5 C Marginal Fail-No Recall 7,078
HCR3.9T2HFR8
1989
04-Dec 1987 General Motors 3.8L .22/1.99/.51/.19/.42 B Passed 51,462
H2G3.8V8XEB7
13-Nov 1987 General Motors 2.8L .27/2.81/.47/.41/1.1 A Passed 40,758
H1G2.8W8XRZ9
25-Oct 1987 BMW 2.7L .30/3.75/.86/.36/.81 B Failed-Recalled ~7,200
HBM2.7V5F300
11-Oct 1987 Ford 4.9L-T .62/3.48/.77/.79/.75 E Failed-Recalled 12,594
HFM4.9T5HGG2
27-Sep 1987 Ford 5.0L .35/1.18/.71/.34/.45 A Passed 40,003
HFM5.0V5HBC7
13-Sep 1987 Honda 2.5L .18/1.77/.48/.39/.13 A Passed 12,640
HHN2.5V5FZC6
30-Aug 1987 Nissan 1.6L .11/4.67/.26/.14/1.1 A Passed 64,461
HNS1.6V9FAC2
21-Aug 1987 NUMMI 1.6L .24/5.17/.56/.35/1.2 A Passed 21,395
HNT1.6V2FCC9
02-Aug 1987 Mitsubishi 1.5L .32/4.92/.66/.33/.83 A Passed 16,139
HMT1.5V2FCD5
19-Jul 1987 Mitsubishi 2.0L-T .25/3.53/.79/1.2/.9 C Passed 14,752
HMT2.0T2FBD4
05-Jul 1987 AMC (Chry) 4.0L-T .25/2.89/1.65/1.9/1.8 C Failed-Recalled ~19,121
HAM242T5LAB4
19-Jun 1987 Chrysler 2.2L .18/1.7/.56/.36/.2 A Passed 26,367
HCR2.2V5FAD3
05-Jun 1987 Volvo 2.3L-Turbo .19/2.3/.30/.15/.95 B Passed 5,991
HVV2.3V5FFT2
22-May 1987 Ford 2.9L-T .42/6.9/.74/.9/.33 C Marginal Fail-No Recall 35,380
HFM2.9T5FCR2
15-May 1986 General Motors 4.3L-T .47/9.7/.63/.7/.63 E Marginal Fail-No Recall 15,917
G1G4.3T5TAA8
01-May 1986 Ford 3.8L .50/4.28/.57/.42/.34 A Failed-Recalled 37,949
GFM3.8V5HHC6
01-May 1987 Suzuki 1.0L .17/2.57/.28/.16/.55 B Passed 34,695
HSX1.0V2FFC6
17-Apr 1986 BMW 2.7L .31/3.4/.85/.38/.76 B Failed-Recalled 19,374
GBM2.7V5F30X
10-Apr 1987 Hyundai 1.5L .58/15.7/.31/.19/.73 B Failed-Recalled 59,003
HHY1.5V2FBC0
03-Apr 1986 Audi 2.2L .22/2.5/.56/.15/.91 B Passed 5,641
GAD2.2V6FCCX
20-Mar 1986 Mitsubishi 2.6L-T 1.27/33.3/.96/.98/1.2 C Failed-Recalled 7,141
GMT2.6T2FBT5
20-Mar 1986 General Motors 3.8L .28/2.7/.59/.24/.54 B Passed 57,437
G4G3.8V8XEB4
06-Mar 1986 Mitsubishi 2.0L-T .46/14.5/1.2/.86/1.1 C Failed-Recalled 21,179
GMT2.0T2FBT2
Page 14
IN-USE VEHICLE COMPLIANCE TESTING SUMMARY Updated 1-21-2001
Test Model Manufacturer Average Standards
Date Year Engine Family HC/CO/NOx/HyNOx/Evap Code* Status Production
06-Mar 1986 General Motors 4.1L .15/1.5/.55/.38/.55 A Passed 27,645
G6G4.1W5NKA3
21-Feb 1986 Ford 3.0L .22/4.6/.76/.41/.19 A Marginal Fail-No Recall 27,665
GFM3.0V5FED2
21-Feb 1987 Yugo 1.3L .41/3.3/.59/.79/2.2 A Failed-Evap and ECS Defects 7,179
HYA1.3V2GAA0 Recalled
06-Feb 1986 Ford 1.9L .44/5.7/1.1/.78/1.1 A Failed-Recalled 28,698
GFM1.9V2GCD6
01-Feb 1986 Mitsubishi 2.0L .80/18.7/.62/.33/.86 A Failed-Recalled 7,754
GMT2.0V2FCA1
18-Jan 1986 Chrysler 5.2L .24/2.0/.68/.43/1.6 A Passed 9,436
GCR5.2V2HCK0
18-Jan 1986 Mercedes 3.0L .39/3.91/.22/.13/.57 B Passed-Fillneck Defect 5,801
GMB3.0V6FA11 MBZ Service Campaign
03-Jan 1986 Nissan 3.0L .41/7.5/.39/.29/.52 A Marginal Fail-No Recall 10,421
GNS3.0V5FBC0
03-Jan 1986 AMC (Chry) 2.5L-T .42/8.9/1.6/1.2/.55 C Failed-Recalled 8,059
GAM150T5LAD3
1988
28-Nov 1986 General Motors 2.0L .21/4.5/.44/.09/.39 A Passed-Manifold Defect 19,414
G1G2.0W5XAG7 Extended Warranty
12-Dec 1986 Volkswagen 1.8L .19/2.1/.40/.20/.94 B Passed 14,152
GVW1.8V6FAC4
15-Nov 1986 Honda 2.0L .22/5.4/.29/.18/1.9 A Passed 30,495
GHN2.0V2FFC1
15-Nov 1986 Toyota 2.4L-T .14/4.1/.38/.11/.70 C Passed 51,719
GTY2.4T2FCC8
31-Oct 1986 Ford 5.0L .53/1.5/.74/.44/.67 A Failed-Recalled 43,226
GFM5.0V5HBC6
31-Oct 1986 Mitsubishi 1.5L .23/8.9/.41/.29/1.1 A Failed-Recalled 24,265
GMT1.5V2FCA1
17-Oct 1986 Mazda 2.0L-T .28/5.3/.63/.43/.71 C Passed 34,453
GTK2.0T2HCM3
17-Oct 1986 Ford 2.5L 3.4/69.6/.59/.40/.32 A Failed-Recalled 36,803
GFM2.5V5HCH8
29-Sep 1986 General Motors 2.8L .39/3.7/.62/.69/.45 A Passed 51,241
G1G2.8W8XGZ4
15-Sep 1986 General Motors 5.7L .41/1.6/.54/.36/.50 G Passed-Evap. Defect 5,697
G1G5.7V8DAAX Recalled
01-Sep 1986 Jaguar 4.2L .25/3.4/2.3/1.4/1.1 B Failed-Recalled 6,025
GJR4.2V5FFA5
22-Aug 1986 Subaru 1.8L-Turbo .25/4.0/.62/.97/.27 B Marginal Fail-Hwy NOx 5,215
GFJ1.8V5HCNX No Recall
04-Aug 1986 Chrysler 2.5L .22/4.4/.49/.25/1.4 A Passed 26,004
GCR2.5V5FAM9
21-Jul 1986 AMC (Chry) 2.8L-T .42/7.2/1.3/1.5/1.2 C Failed-Recalled 13,278
GAM173T2F4C4
12-Jul 1986 NUMMI 1.6L .23/3.4/.56/.20/1.3 A Passed 15,912
GNT1.6V2FCC8
29-Jun 1986 Isuzu 1.5L .13/2.9/.31/.24/1.1 B Passed ~5,000
GSZ090V2FNG8
20-Jun 1986 Volvo 2.3L .24/2.5/.41/.13/.91 B Passed 17,919
GVV2.3V5FELX
09-Jun 1986 Hyundai 1.5L .32/8.6/.44/.36/1.0 B Failed-Recalled 28,645
GHY1.5V2FCBX
31-May 1985 Ford 3.8L .54/2.1/.82/.52/.39 A Failed-Recalled 42,707
FFM3.8V5HHC5
Page 15
IN-USE VEHICLE COMPLIANCE TESTING SUMMARY Updated 1-21-2001
Test Model Manufacturer Average Standards
Date Year Engine Family HC/CO/NOx/HyNOx/Evap Code* Status Production
18-May 1985 Nissan 1.6L .29/9.3/.45/.30/2.6 A Passed 23,851
FNS1.6V9FBC2
09-May 1986 Suzuki 1.3L-T .16/5.0/.33/.78/.92 I Passed-Catalyst Defect -32,334
GSK1.3T2FFC2 Recalled
27-Apr 1985 Mitsubishi 2.0L-T .47/12.8/.68/.43/.94 C Failed-Recalled 16,207
FMT2.0T2FCA1
18-Apr 1985 Chrysler 5.2L-T .55/7.4/1.0/1.3/.89 E Marginal Fail-No Recall 15,726
FCR5.2T2HBN1
06-Apr 1985 Volkswagen 1.8L .27/2.8/.75/.37/.55 B Passed-VECI Label 12,925
FVW1.8V6FAC3 Problem-Recalled
28-Mar 1985 Toyota 1.6L .25/4.1/.60/.33/1.2 A Passed 34,926
FTY1.6V2FCCX
17-Mar 1985 General Motors 2.8L-T .40/6.2/1.3/.83/1.2 C Passed-ECS Defects 24,193
F1G2.8T2TRA3 Extended Warranty
08-Mar 1985 Mazda 1.1L .24/4.1/.37/.24/.82 A Passed 11,233
FTK1.1V4GCC3
29-Feb 1985 Audi 2.2L. .19/2.2/.76/.22/.48 B Marginal Fail-No Recall 6,125
FAD2.2V6FCC9
16-Feb 1985 Ford 1.9L .41/5.0/.81/.50/1.2 A Failed-Recalled 13,669
FFM1.9V2GDC5
02-Feb 1985 Honda 1.8L .15/5.1/.30/.27/.64 A Passed 32,272
FHN1.8V3FYC4
19-Jan 1985 General Motors 5.0L .14/5.5/.68/.45/1.9 A Passed 23,488
F3G5.0W4NBA3
11-Jan 1985 Nissan 2.4L-T .12/4.9/.80/.80/.50 C Passed 46,170
FNS2.4T9FAC8
1987
17-Dec 1985 BMW 1.8L .50/3.3/.47/.30/.52 B Failed-Recalled 10,297
FBM1.8V5FAB5
03-Dec 1985 Mitsubishi 2.0L .38/10.8/.70/.30/.90 A Failed-Recalled 8,667
FMT2.0V2FCAO
19-Nov 1985 AMC 1.4L .39/5.1/.7/.40/2.1 B Failed Evap.-Recalled 6,825
FAM1.4V5FFA2
10-Nov 1985 Chrysler 2.6L-T .19/5.5/1.1/---/.80 C Marginal Fail-No Recall 17,274
FCR2.6T2BBK2
21-Oct 1985 Suzuki 1.0L .20/3.3/.45/.26/.63 B Passed 28,828
FSK1.0V2FFC4
06-Oct 1984 Subaru 1.8L .16/3.7/.54/.25/.77 B Passed 7,321
EFJ1.8V2HCF8
23-Sep 1985 Volvo 2.3L .23/2.0/.49/.12/.63 B Passed 17,243
FVV2.3V5FEL9
14-Aug 1984 Volkswagen 1.9L-T .43/4.1/.77/.27/1.4 I Marginal Fail-No Recall 7,079
EVW1.9T5CVA2
10-Aug 1984 General Motors 3.8L .30/3.9/.71/.93/1.7 A Passed 78,425
E4G3.8W2NEY5
23-Jul 1984 Ford 5.8L-T .60/5.2/.86/1.0/--- E No Decision 17,368
EFM5.8T2HGG0
15-Jul 1984 Toyota 2.4L-T .45/6.3/.56/.63/.92 C Marginal Fail-No Recall 64,789
ETY2.4T2EBB0
X-XX 1984 Mazda 1.1L .28/6.3/.32/.23/.89 A Passed not available
ETK1.1V4GCC2
24-Jun 1984 Nissan 3.0L .32/3.3/.48/.27/.46 A Passed 10,328
ENS3.0V5FAC7
12-Jun 1984 Audi 2.2L .35/5.1/.36/.18/.74 B Passed 8,026
AD2.2V6FCC8
18-May 1984 Mitsubishi 2.0L .59/12.9/1.1/.74/1.1 A Failed-Recalled 9,370
EMT2.0V2FCAX
Page 16
IN-USE VEHICLE COMPLIANCE TESTING SUMMARY Updated 1-21-2001
Test Model Manufacturer Average Standards
Date Year Engine Family HC/CO/NOx/HyNOx/Evap Code* Status Production
20-May 1984 Peugeot 2.0L .28/3.8/.74/.51/.57 F Failed-Recalled 14,947
EPE2.0V6FAB5
08-May 1984 BMW 1.8L .36/3.2/.7/.55/.60 F Failed-Recalled 19,838
EBM1.8V5FAB4
01-May 1984 AMC 1.4L .48/5.4/.96/.78/--- A Failed-Recalled 7,273
EAM1.4V5FJD5
22-Apr 1984 Ford 2.3L .66/15.8/.84/.78/1.6 A Failed-Recalled 17,983
EFM2.3V1HECX
15-Apr 1984 Chrysler 2.2L .40/6.1/.90/.57/.33 A Failed-Recalled 8,434
ECR2.2V5HDL0
12-Mar 1984 Mazda 2.0L-T .22/3.1/.61/.66/1.0 C Passed 23,975
ETK2.0T2ACM2
15-Mar 1984 Toyota 2.4L .26/2.8/.68/.4/.12 A Passed 20,455
ETY2.4V5FBB3
25-Feb 1983 General Motors 3.8L .40/7.1/.70/.25/1.5 B Failed-Recalled 50,483
D4G3.8W2TMAO
22-Jan 1984 Ford 1.6L .57/6.8/.88/.78/1.1 A Failed-Recalled 28,118
EFM1.6V2GDC8
08-Jan 1984 Nissan 1.6L .31/7.1/.33/.21/.58 A Marginal Fail-No Recall 40,234
ENS1.6V9FACX
1986
20-Oct 1983 Mitsubishi 1.8L 1.0/20.1/.9/.85/2.1 B Failed-Recalled 7,516
DMT1.8V2BCA4
19-Sep 1983 Chrysler 2.2L .41/5.9/.96/1.2/1.6 B Failed-Recalled 23,648
DCR2.2V2HCL7
20-Aug 1983 Honda 1.8L .37/6.0/.55/.43/1.0 B Passed 35,894
DHN1.8V3AFC5
17-Jul 1983 General Motors 2.8L-T .40/8.2/1.2/1.2/1.2 C Failed-Recalled 23,909
D1G2.8T2TRA1
X-XX 1983 Mazda 1.5L .28/6.6/.44/.67/.79 A Passed 6,998
DTK1.5V2HDD1
1985
X-XX 1983 Nissan 1.6L .33/6.9/.47/---/--- A Passed 25,985
DNS1.6V9FAC9
09-Jan 1983 Toyota 1.6L .31/6.3/.64/---/--- A Passed- Igniter Defect 146,179
DTY1.6V2FCC8 Recalled
25-Nov 1983 Volvo 2.3L .38/4.8/1.0/---/--- B Failed-Recalled 13,579
DVV141V5FSN4
18-Oct 1982 Chrysler 2.2L .35/5.9/1.1/---/--- B Failed-Recalled 16,438
CCR2.2V2HFL1
24-Sep 1982 Ford 1.6L .54/9.4/.65/---/--- B Failed-Recalled 39,067
CFM1.6V2GKC2
1984
~3-1 1982 General Motors 1.8L .20/4.5/1.1/.8/3.7 A Failed-Recalled 30,131
C1G1.8V2NNA0
~7-1 1982 Nissan 2.8L .62/6.6/.73/.39/.88 B Failed-Recalled 19,977
CNS2.8V5FAF4
~6-1 1981 General Motors 5.7L-D .30/1.1/2.0/---/--- H Failed-Recalled 20,679
13J9ZZGH
~4-1 1981 Ford 2.3L .81/8.9/1.0/1.2/6.4 B Failed-Recalled 17,420
2.3AX
~3-1 1981 Mitsubishi 2.6L .53/11.6/.9/.77/2.1 B Failed-Recalled 4,360
BMT2.6V2BC9
~2-1 1981 Chrysler 2.2L .65/7.5/.7/.82/2.2 B No Decision 22,562
BCR2.2V2HU8
Page 17
IN-USE VEHICLE COMPLIANCE TESTING SUMMARY Updated 1-21-2001
Test Model Manufacturer Average Standards
Date Year Engine Family HC/CO/NOx/HyNOx/Evap Code* Status Production
1983
~9-1 1980 Volkswagen 1.6L .28/2.8/.95/.84/.87 D Passed 9,582
37CL
~7-1 1980 Honda 1.7L .41/3.3/1.0/1.0/.62 D Passed 32,000
A80D
~6-1 1980 Nissan 2.0L .41/4.2/.93/.92/1.0 D Passed 23,000
Z20EC
~5-1 1980 Ford 5.0L .53/4.5/1.2/.96/--- D Failed-Recalled 17,160
4.2/5.0BJC
~7-1 1980 General Motors 3.8L .36/7.1/.95/.78/--- D Passed 9,900
04E2MCRZ
Standards Code
*A: .39/7.0/.7/.9/2.0 G: .41/3.4/1.0/---/2.0 M: .41/9.0/.4/.8/2.0 S: .25/3.4/.4/.8/2.0
B: .41/7.0/.7/.9/2.0 H: .52/3.4/1.5/2.0/--- N: .39/9.0/.4/.8/2.0 T: .32/4.4/.7/1.4/2.0
C: ..39/9.0/1.0/2.0/2.0 I: .41/9.0/1.0/2.0/2.0 O: .32/4.4/1.0/2.0/2.0 U: .39/5.0/1.1/2.2/2.0
D: .41/9.0/1.0/2.0/2.0 J: .8/10.0/1.4/---/2.0 P: .25/3.4/.4/.55/2.0 V: .075/3.4/.2/.3/2.0
E: .50/9.0/1.0/2.0/2.0 K: .39/7.0/.4/.55/2.0 Q: .125/3.4/.4/.55/2.0
F: .41/7.0/.4/.5/2.0 L: .6/9.0/1.0/2.0/2.0 R: .160/4.4/.7/1.4/2.0
e = Enhanced Evaporative b = both enhanced and Standard Evaporative I = With applicable in-use standard
Page 18
On the 1998-2004 (except Direct inject engines) the transmission is a sealed unit and doesn't have a dipstick. To check it the truck should be warmed up but not excessively hot. With the e-brake on an the wheels blocked, start the engine, place your shifter in neutral, remove the upper fill plug on the transmission and the fluid should just dribble out.
Post 1:
There are 2 nuts on the bottom of the tranny pan. The lower one is the drain. The one at the back of the pan in a recess is the filler. You need a hand pump or something similar to fill it to overflowing, then top it off with the engine running. Make sure you shift through the gears a couple of times when topping off.
Post 2:
You'll find two hex head plugs facing downward on the main/big tranny pan. The drain plug is the lower of the two that can be easily seen. The fill/level check plug is not so obvious. It's in the rear, right corner of the main pan, at the top of a semi-circle recess stamped deep into the pan. Both plugs are identical is size & dimension. As with any auto tranny, you have to check ATF level on a level surface, with the vehicle running & fully warmed up. ATF should just dribble out of the fill hole- indicating adequate level. If you check it with the truck off, ATF will POUR out of the hole since much of the ATF drains to the pan when the engine is off. You have to use a pump to get new ATF up & into the tranny.
Link to writeup
Link to Photo of the transmission filter (it is like a sponge)
So we get down there, look at it and determine what to do. * Support drivetrain on the t-case skid plate with jack. * Unbolt twisted, bent t-case/tranny crossmember. * Remove brake/fuel line heat shield protecting said lines from the crossmember. * Unbolt tranny support from crossmember and move crossmember out of the way. * Remove tranny support from the tranny. * Drain flid from tranny pan (2 plugs, one low, one high[allen head]). * Once fluid has drained, unbolt the pan from the tranny and set aside. * Unbolt filter from the tranny and discard. * Remove gasket material left on the tranny and pan. * Clean gasket mounting etc with a solvent on tranny and pan. * Remove magnet from bottom of pan and clean all metal dust remnants from magnet, and wipe out pan after all fluid has been drained.
[rant on]Since some BRAINIAC at GM/Isuzu designed the 4L30E WITHOUT a dipstick or any other way to fill the fluid, you get to take a bath in Mercron, no two ways around it... :mad: Remember the allen head plug I referenced, well that is the overflow aka FILL plug too!!! So, since the overflow hole parallel to the ground, how do you suppose you place fluid vertically into a pan that holds the fluid, maybe 3" below that hole? WTF, some people shouldn't live, or breed as the case might be.[/rant]
* Install new filter on the tranny, round hole down. * Fill up the pan with 6-7 pints of fluid (nearly to the overflow line. * With two people, lift up full pan to the tranny, and stick 2 bolts in opposing corner with each person (all 4 corners are bolted) * Complete the installation of the tranny pan, and reverse process for the crossmember, support, and jack.
What did the filter look like after 85K and yearly flushes on a 99?
It was full of contaminants... metal sludge (akin to a aluminum paste).
No chunks of metal, just sludge, again with the paste... thick and gooey, like aluminum colored mud.
link to a full write up with high res photos
I've had a problem with hard shifting on-and-off for over a year. It usually happens only in the morning, and is always after the dash light fails to indicate that the truck is in drive. I had the codes read at a dealer last June, and got back a P0705 code. Is this the range sensor malfunction? If so, any recommendations on what needs to be done and where to get it looked at?
I had the same problem with my 99 Passport. I was able to remove my range sensor, take it apart and clean the contacts inside. I remember it was quite dirty and greasy inside. I think they used too much dielectric grease in it, but the contacts were definitely dirty so I cleaned them reassembled it and I have never had the problem come back. The unit is located on the side of the transmission (drivers side) just forward of center. It's been well over a year since I fixed it, but if I remember right to remove it there was a small metal shield that pops off. Then I had to remove 2 bolts and 1 nut that holds the shifter arm and unplug the wire harness (the wire harness was a little difficult to unplug due to the tight space) and the unit will just slide right out. You will need a torx driver to take apart the unit. I wiped most of the grease out of mine; I left some of the grease there so things will slide properly and to keep moisture out. Depending on how dirty the contacts are you can clean them with a pencil eraser or a very, very fine sand paper. Don't spend the 90+ dollars for a new one this is a fairly easy fix, once you see the inside you won't think it's worth the price tag! It should take you about 45-60 min to repair.
I have not read many posts on problems with the transmissions on the 98-03 Isuzu's. Some common problems are that the tranny feels like it is slipping or it is shifting funny. Many times this is due the a weak charging system (battery that is dieing, or the alternator is on the way out) or the electrical connection to the tranny is loose and dirty. Also, others have noted that the funny feeling is due to low or dirty fluid. Finally it can be caused by a faulty tranny selector (the connection needs to be cleaned and put back together with dielectric grease).
As for changing the tranny fluid, some are for flushing and others think that dropping the pan is the best way. If you only drop the pan you will only be removing about 40% of the fluid, whereas the flush will pretty much replace all of the fluid. There is a filter in the pan that should be replace at some point (your guess is as good as mine, but some have mentioned a 60-90K interval to replace the filter, but always change the fluid at least every 30K or sooner if you only do a partial fluid swap). Fluid is cheap, but a new tranny costs about 3500 bucks, keep up on your tranny maintenance.
http://www.automotiveforums.com/vbulletin/showthread.php?t=178005&highlight=code
How to on a Isuzu Transmission Rebuild Hydra-Matic 4L30-E automatic transmission (17meg file):
The reason I was thinking the serpentine belt was at fault is because I had the belt changed a couple of months ago. I had them order the belt, they said it would be ready in four days. Four days later I went to get the belt changed and they said they did not have it but they had one that was close. When they stretched my old belt and the new belt. The new belt was about a half inch longer. The said the tension pulley would take up the slack. It suddenly dawned on me after reading this thread that my old belt may have already been worn and stretched and comparing the sizes between old stretched belt and new would be inaccurate. Maybe there is not enough tension in the belt to prevent a random slippage.
After the belt was changed the P01870 came on, but not immediately it takes a couple of days or 100 to 200 Kms before the light comes on after the codes are cleared. I'm thinking the lack of tension is not enough to affect the cooling system or other systems, but is enough to have the alternator under produce after a 100 kms.
I am also finding the dealer inept and\or devious (I have already caught them lying twice). I find that the best way to figure this problem
out is discussing this hear before I spend to have the tranny opened up. I appreciate your knowledge and help.
|
Originally Posted by 2eyefishclaw
just reading this post dont change the tranny first thing to do replace the filter then get the thing flushed. next disconnect both battery terminals touche the two together for 15 seconds reconnect both of them problem should be gone if it does come back all you need to replace is the torque convertor |
I got filter and fluid chaged. I remember the mechanic told me to disconnect the battery an reconnect it. I haven't tried it yet. Will try soon. He told me the light will disappear. It may come back again. Why do we need to touch both terminals together. Also where can i find info on torque convertor.
Thanks,
Puneet


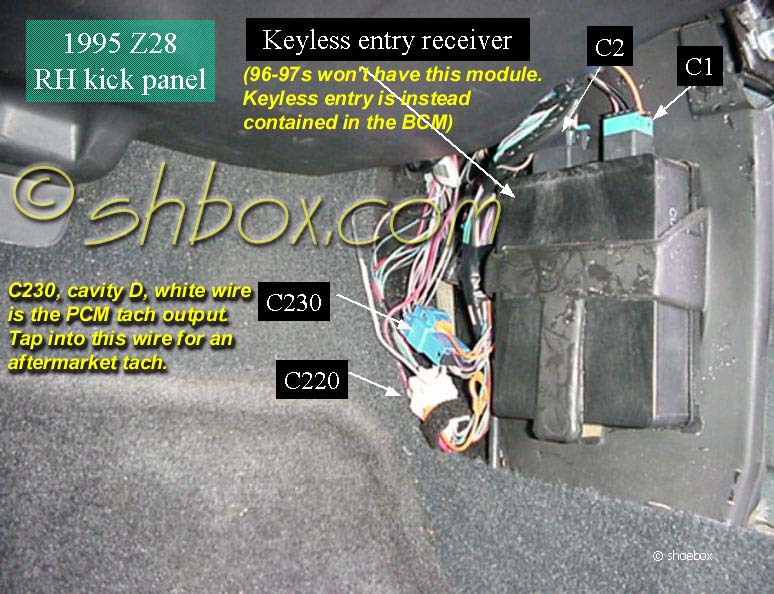
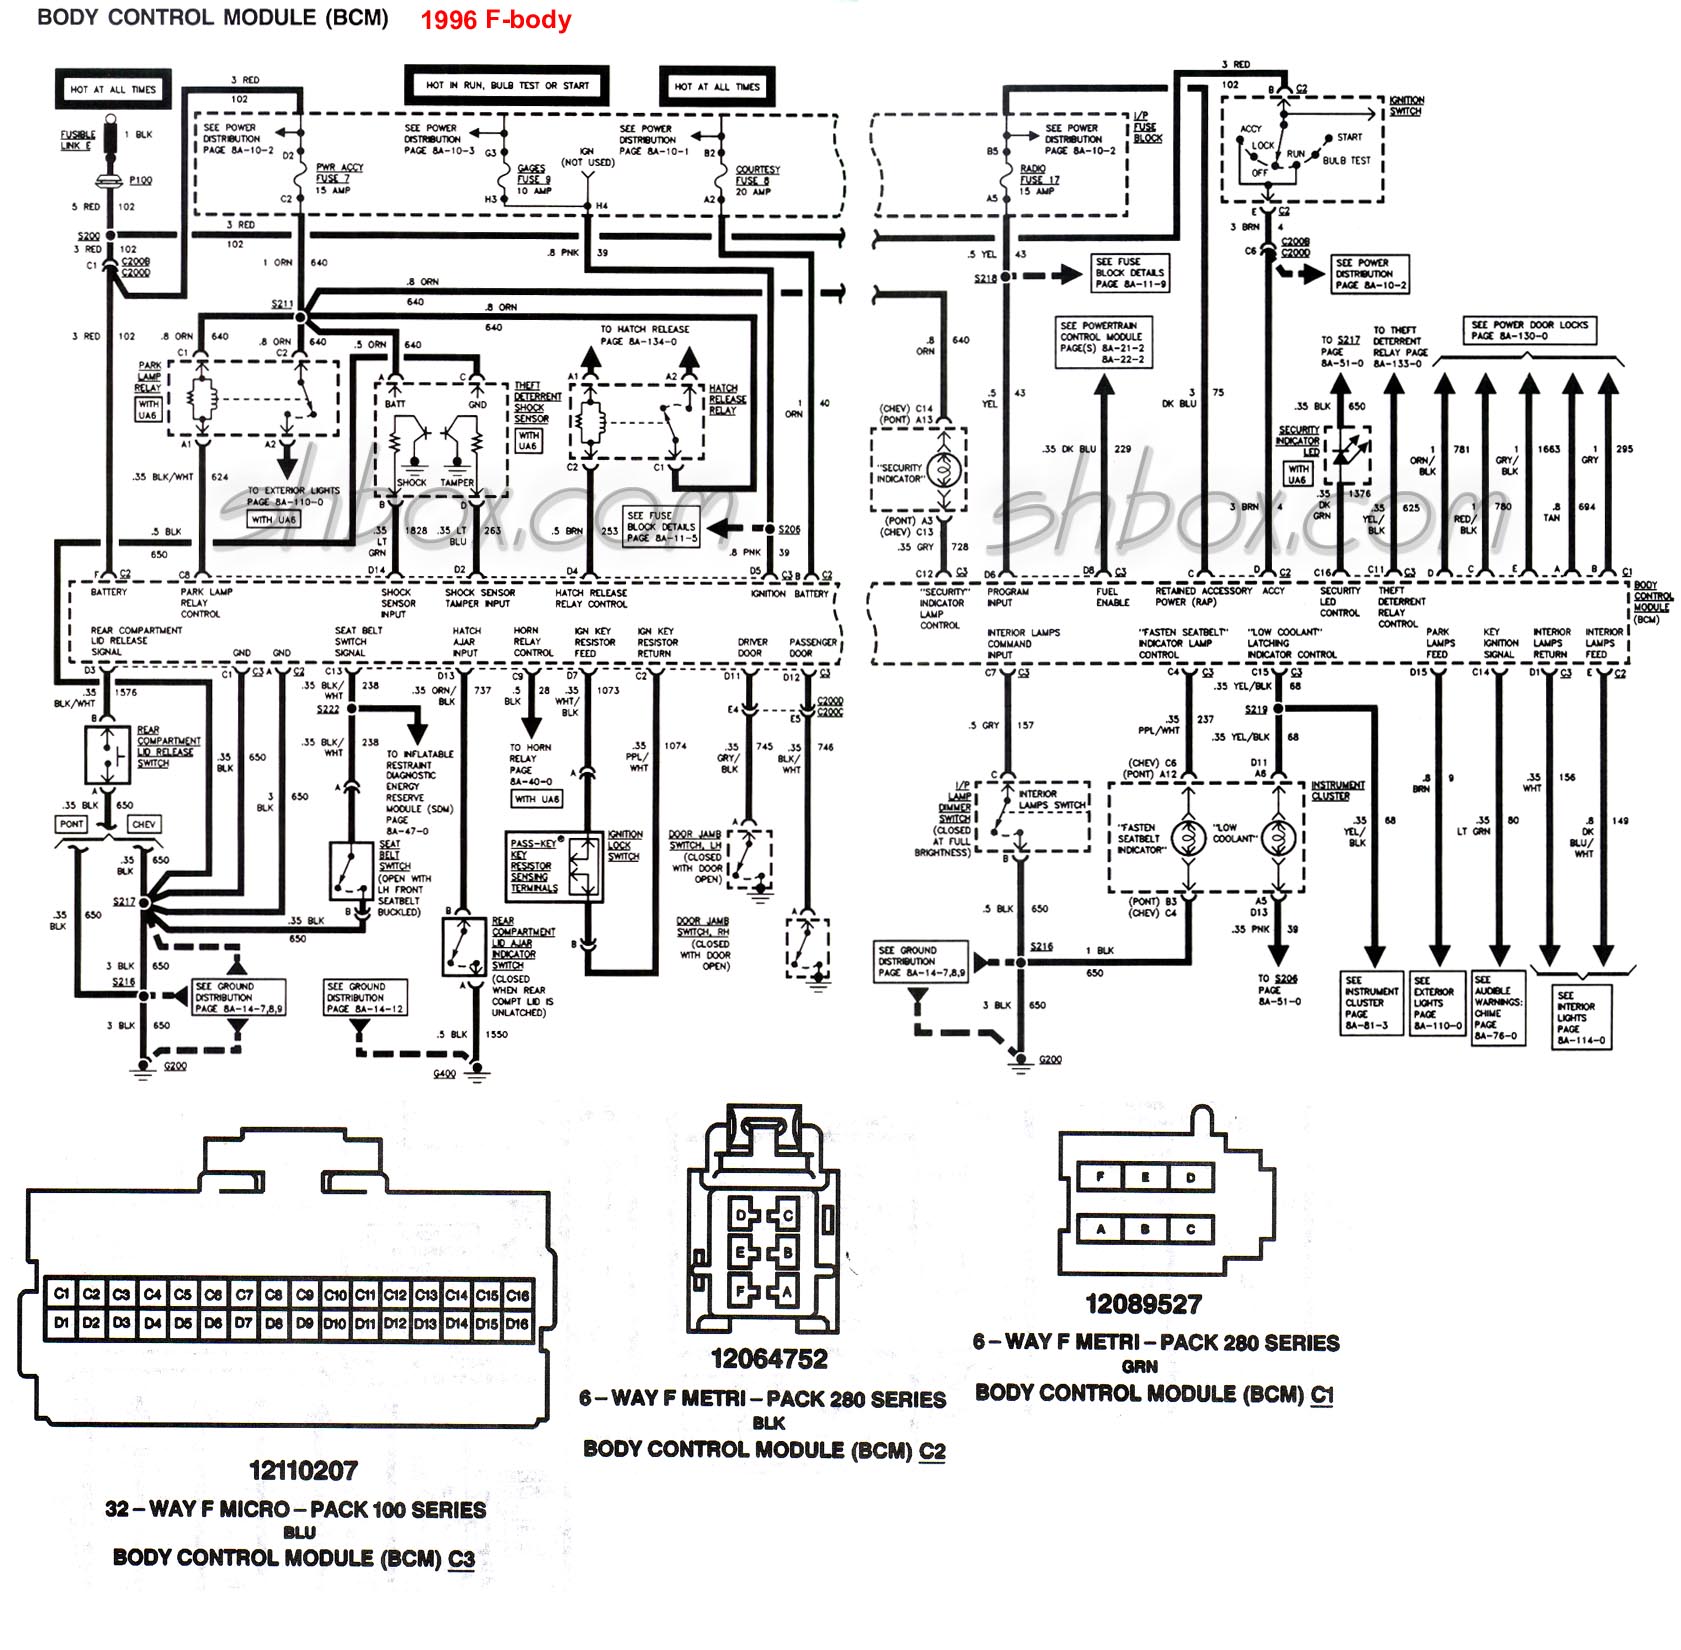
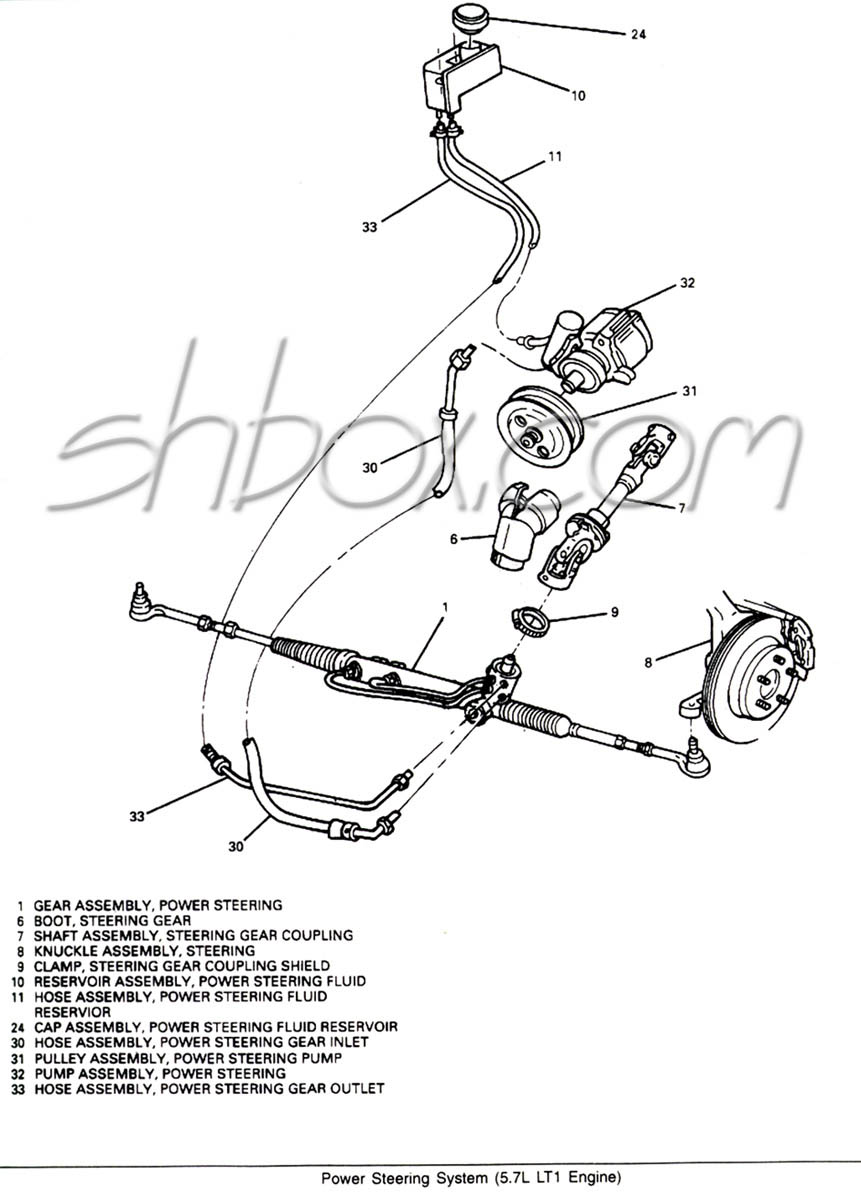
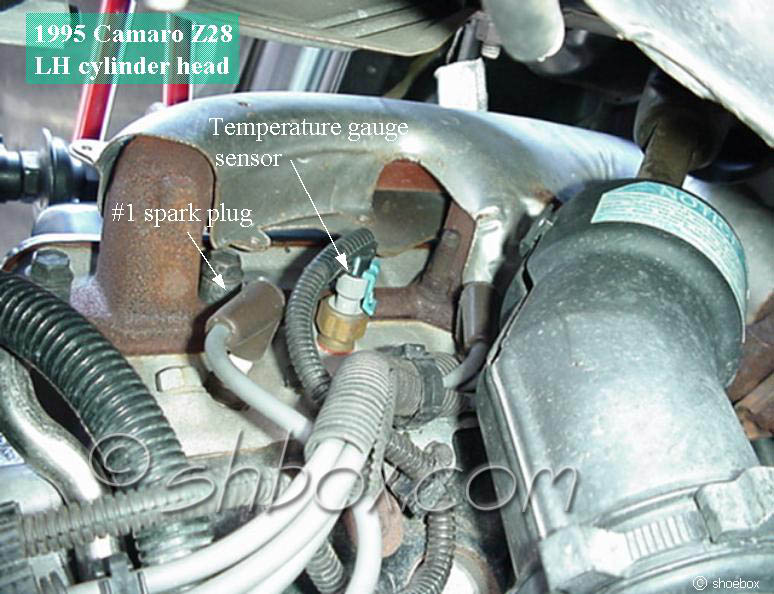
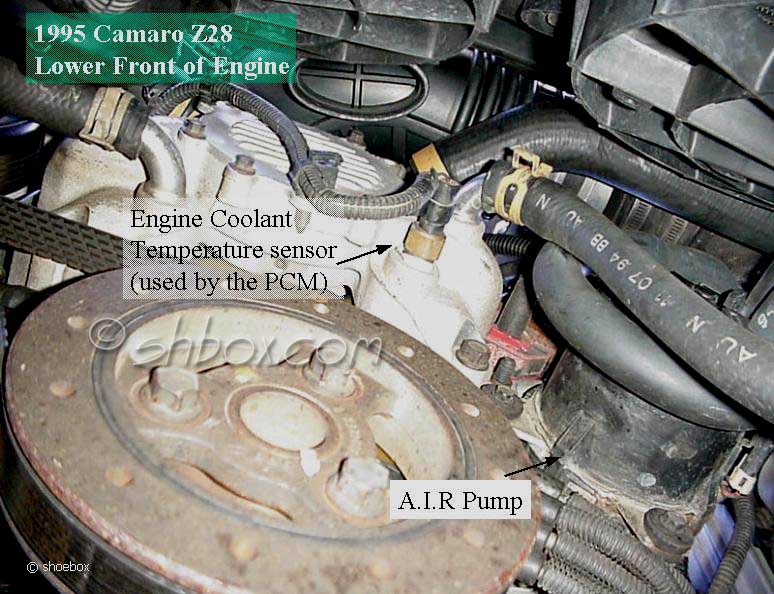
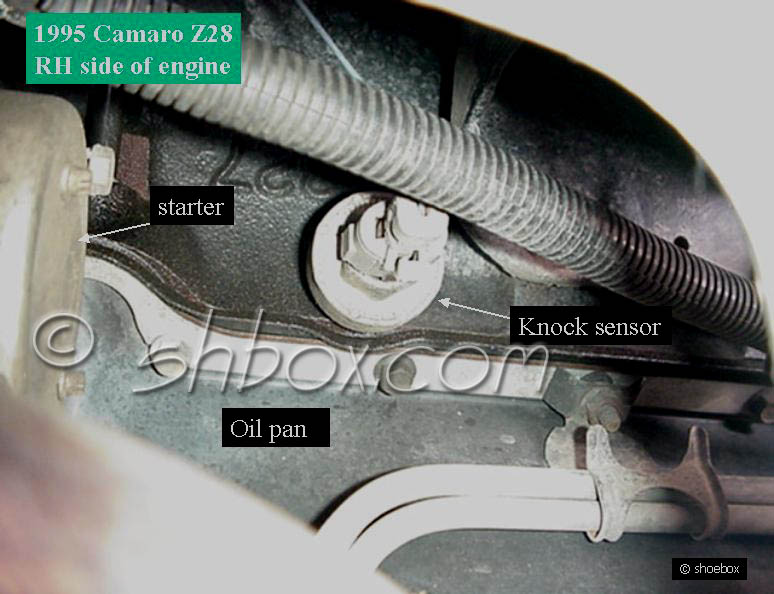
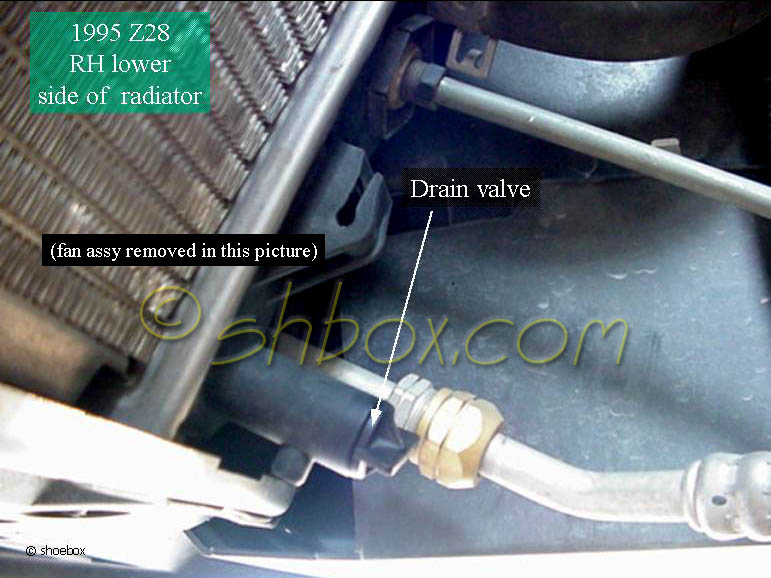
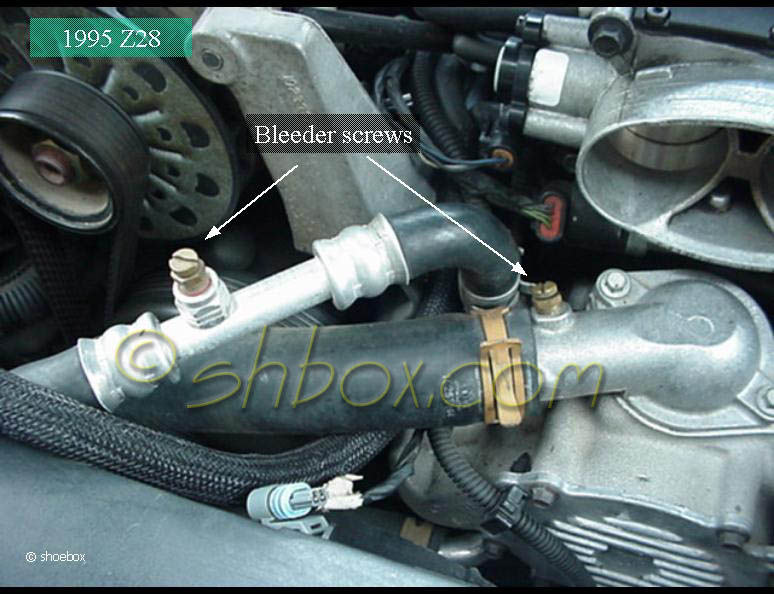
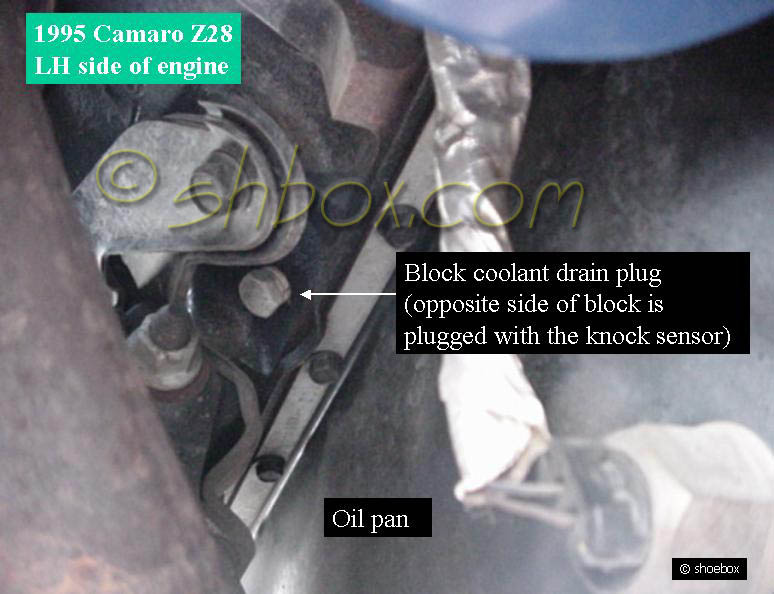
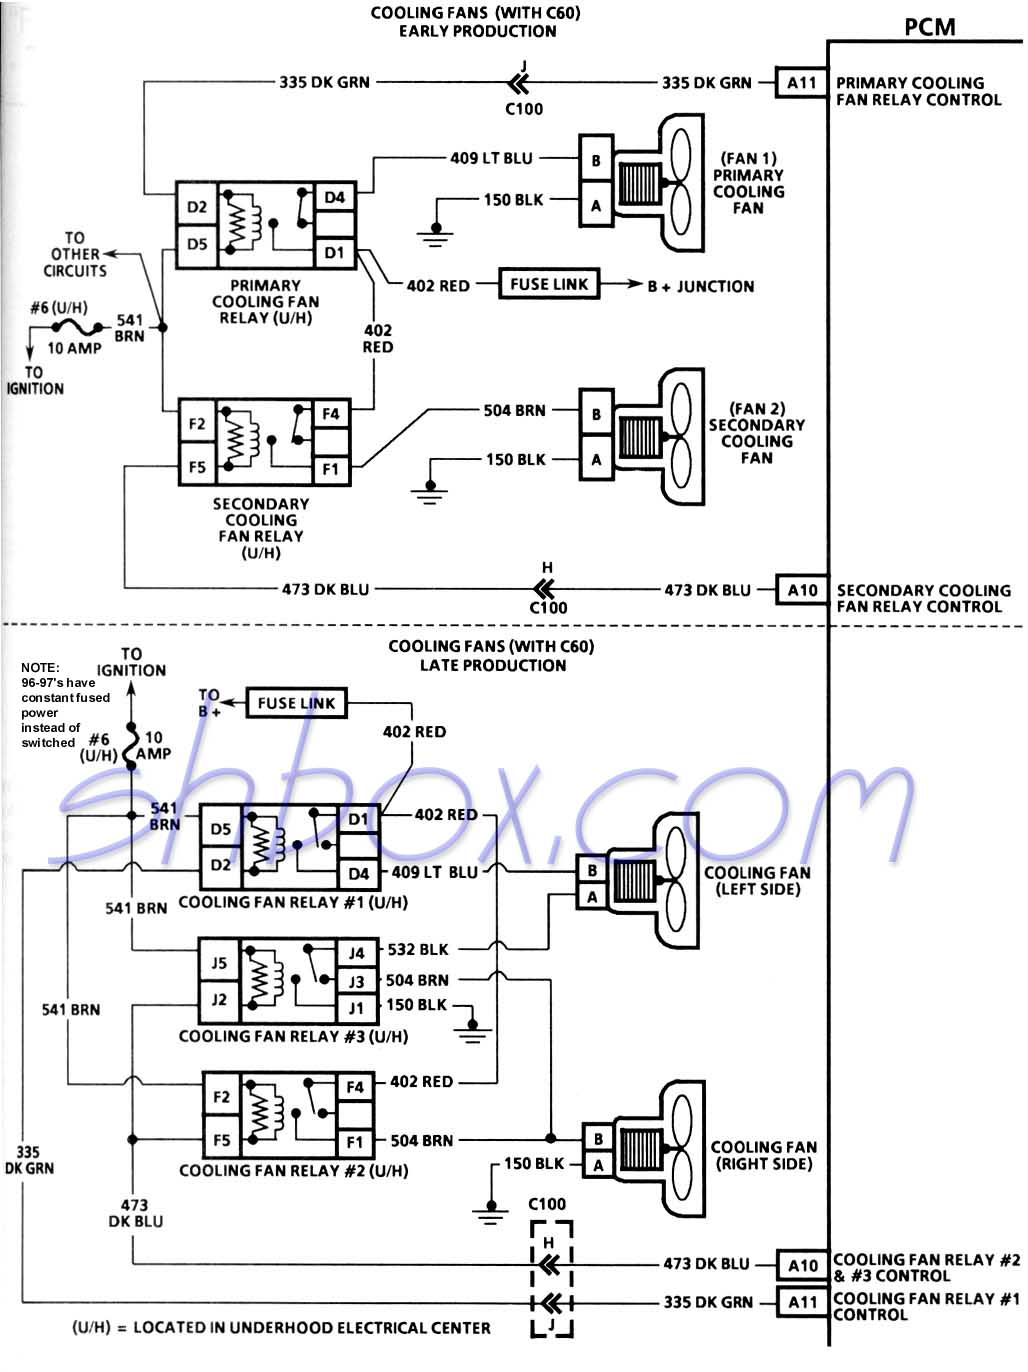
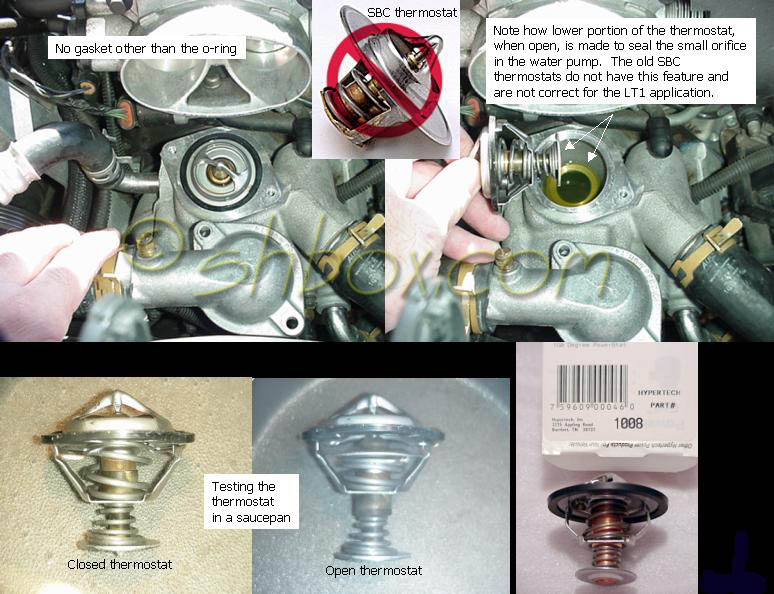
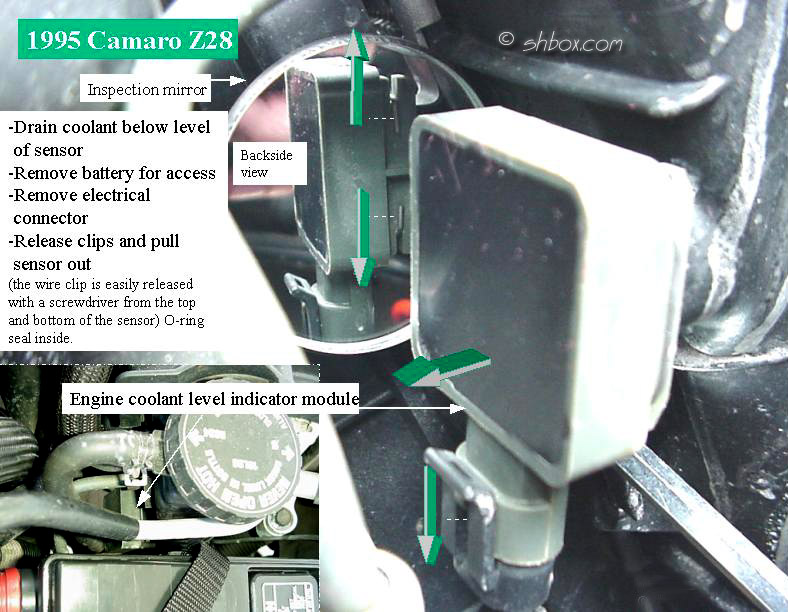
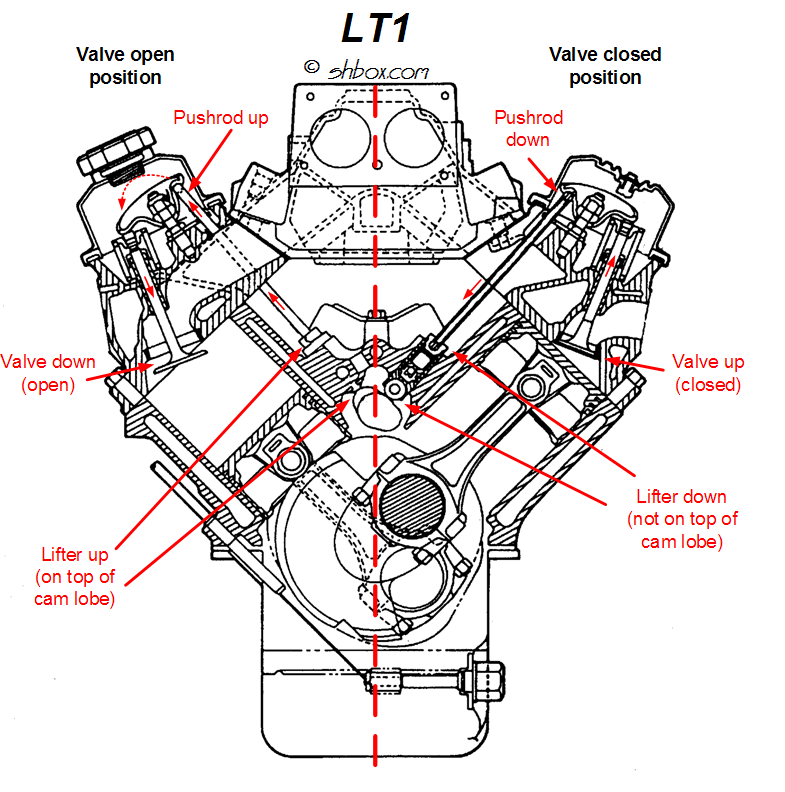
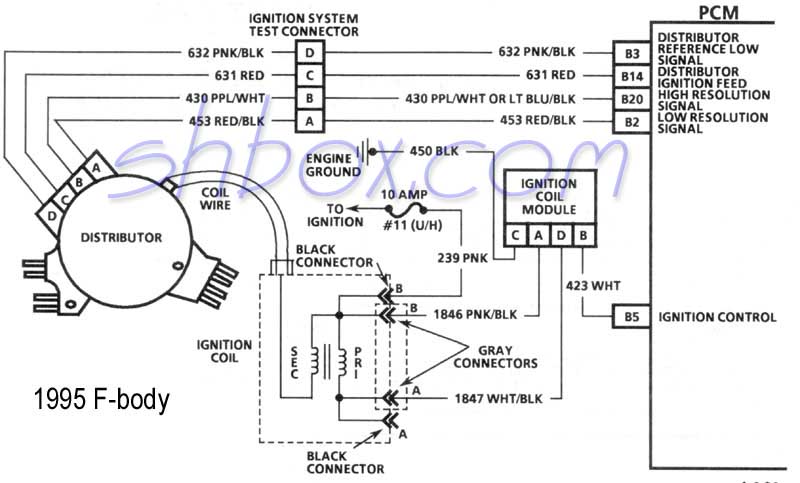
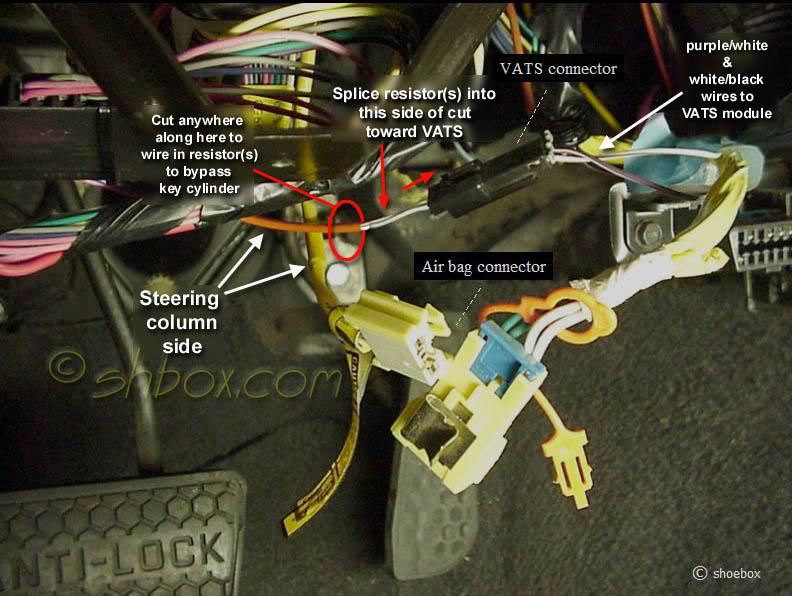
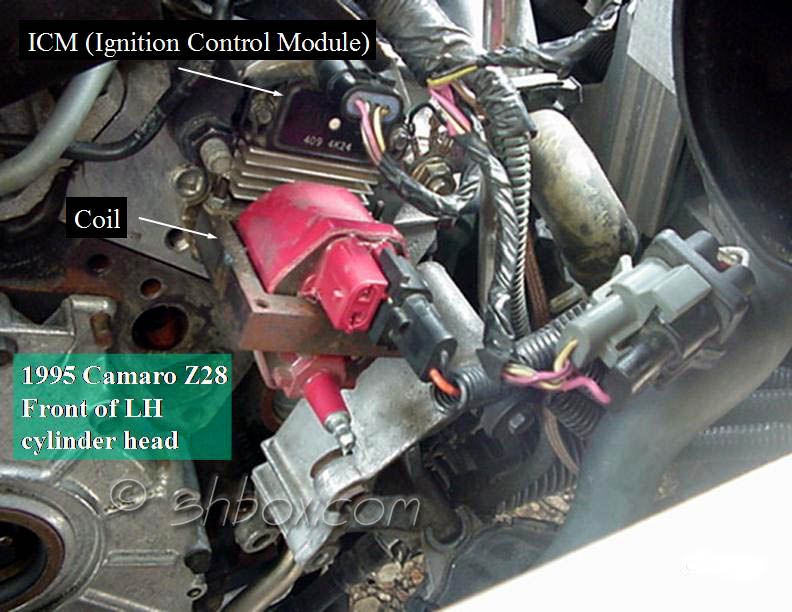
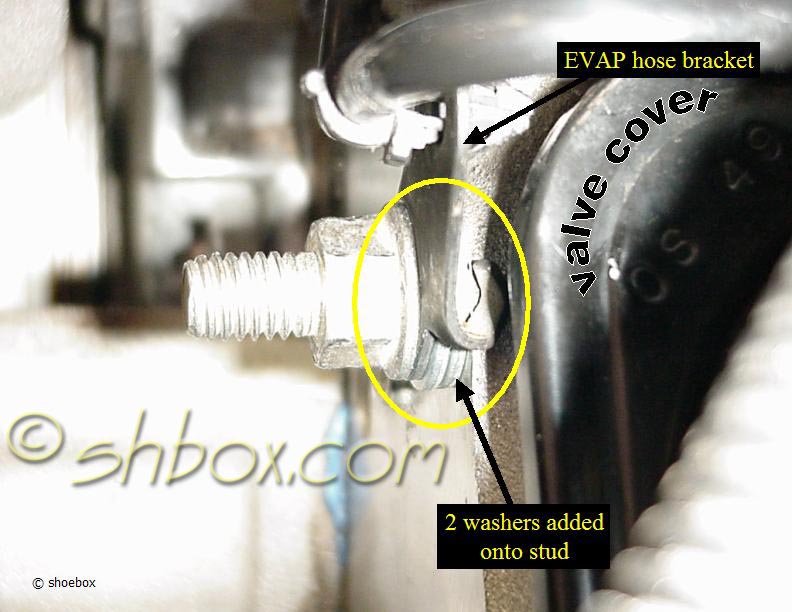
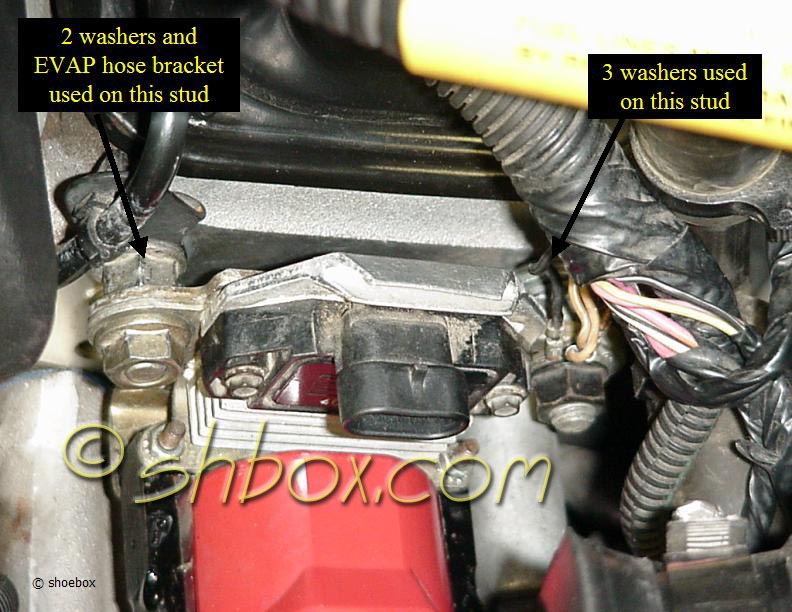
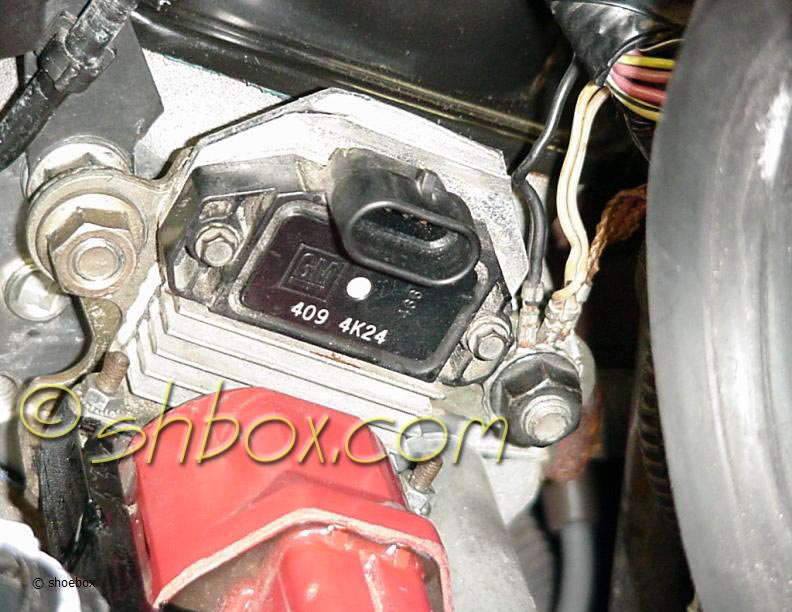
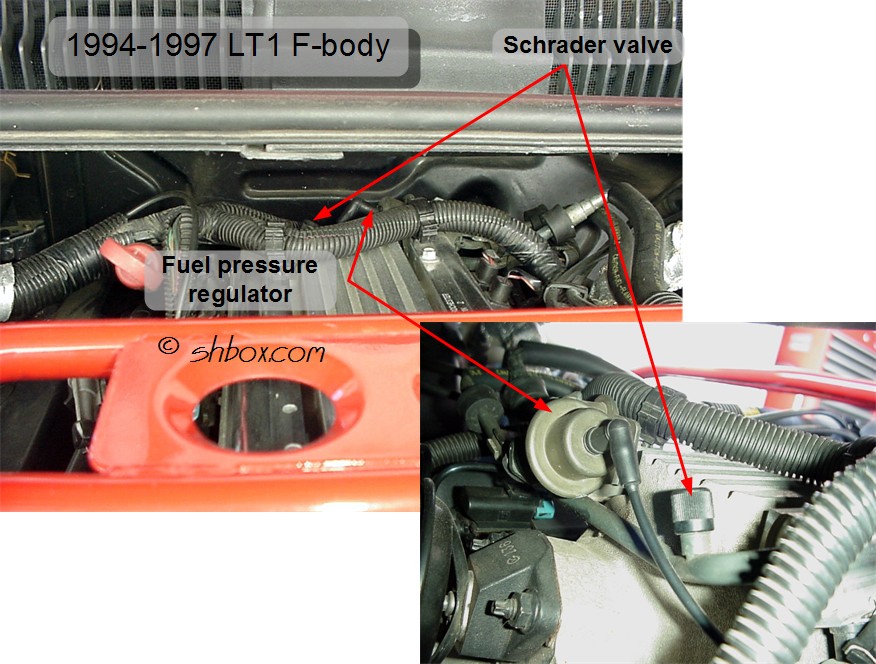
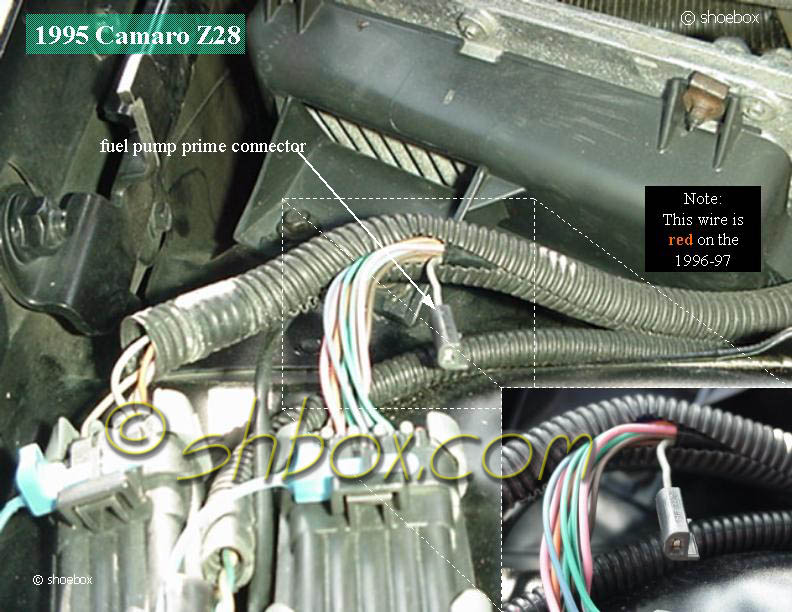
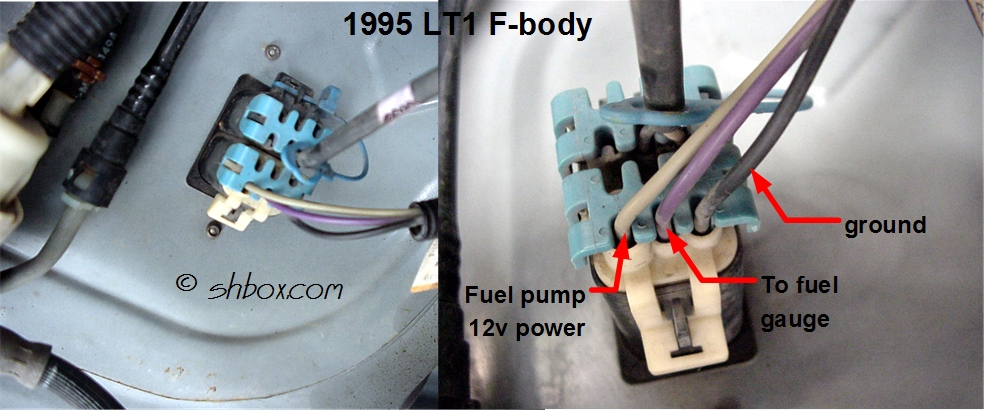
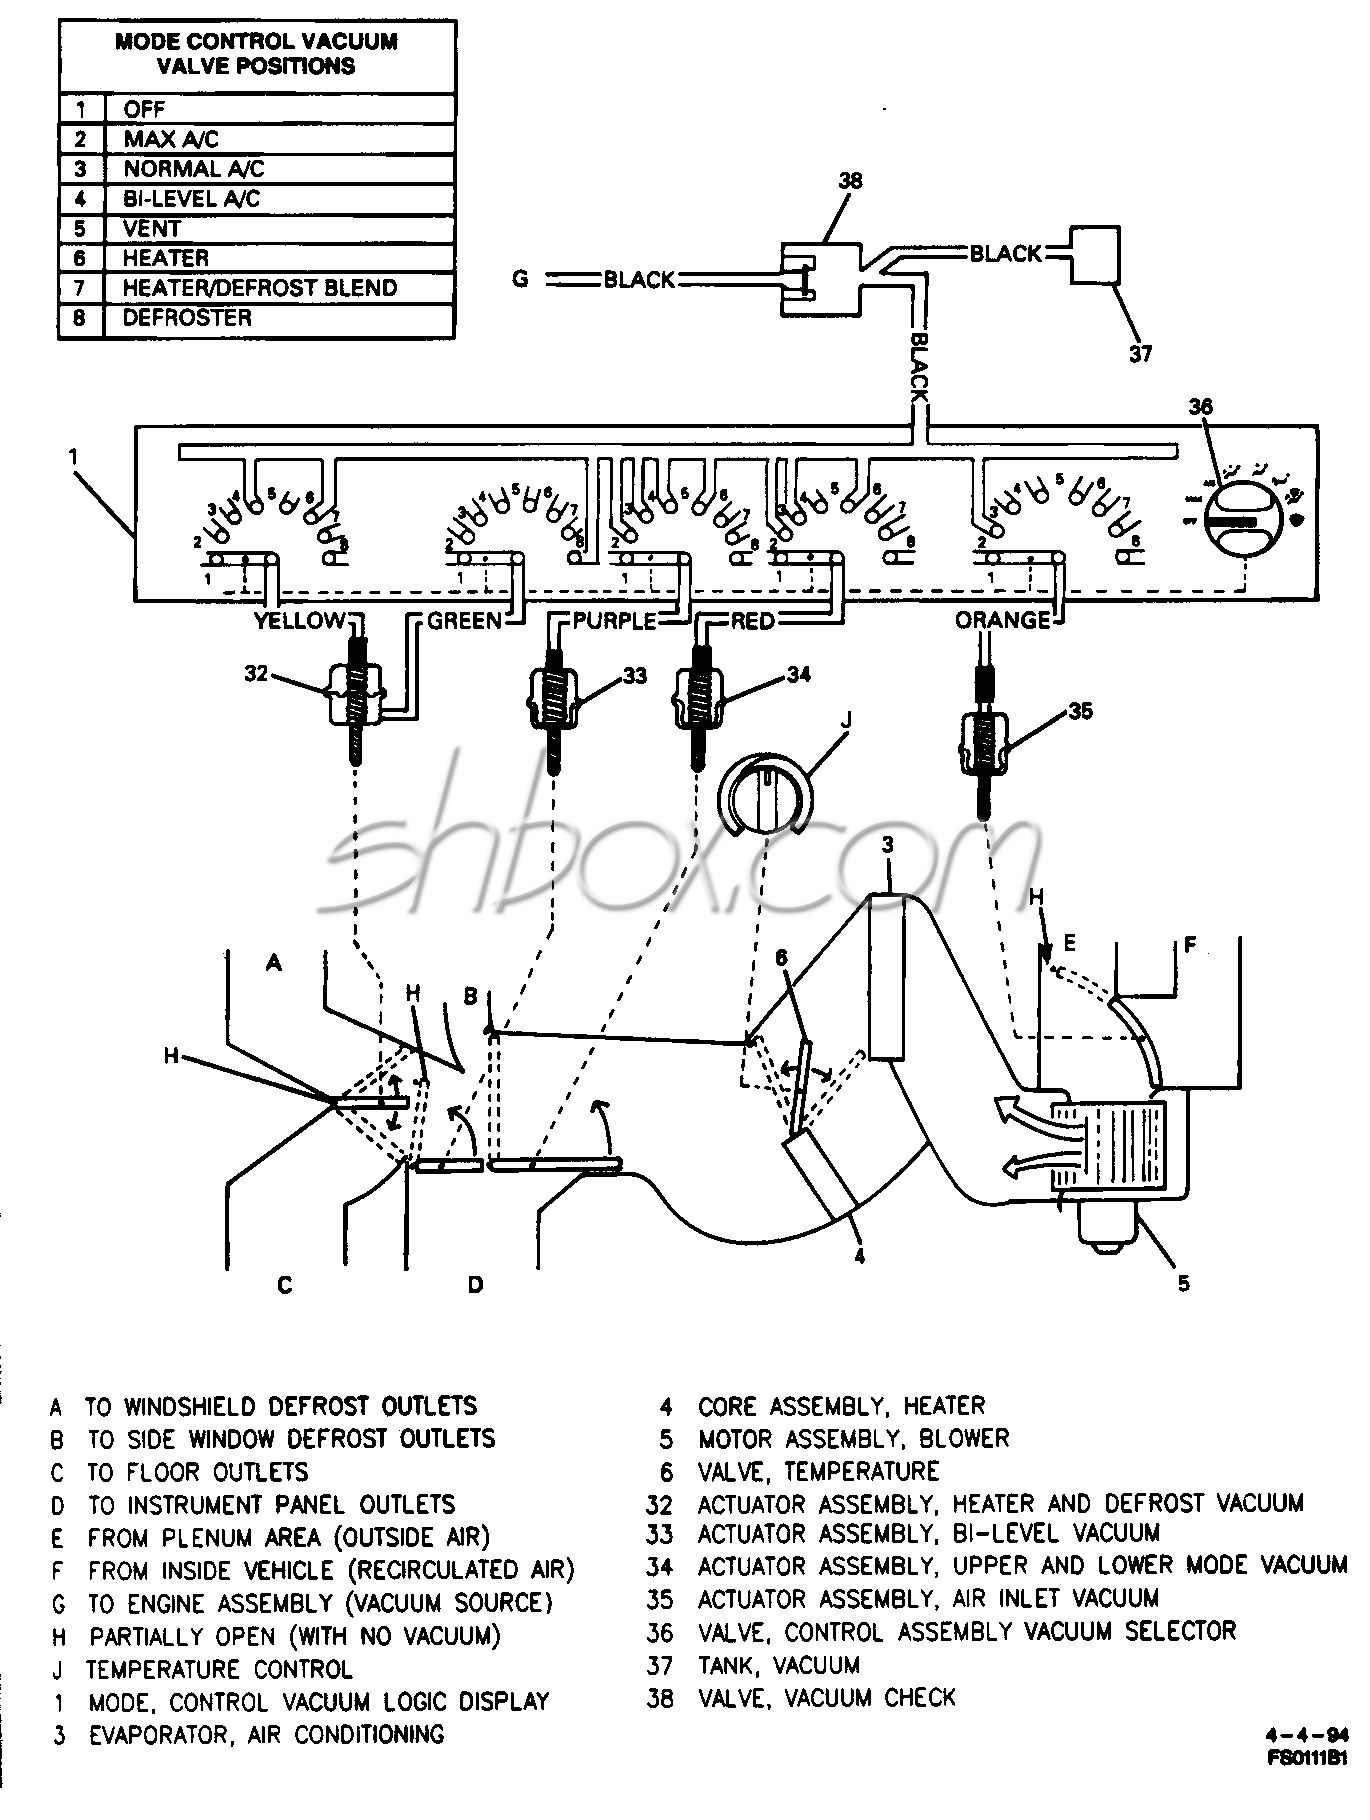
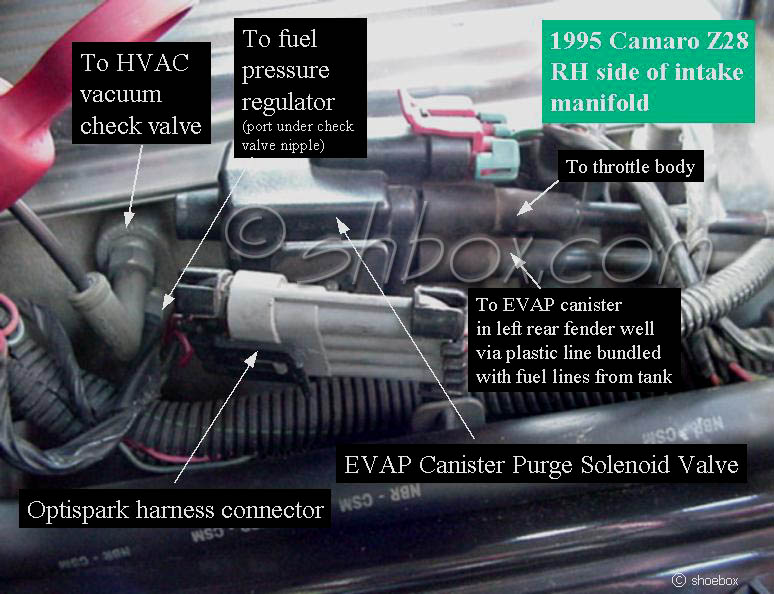
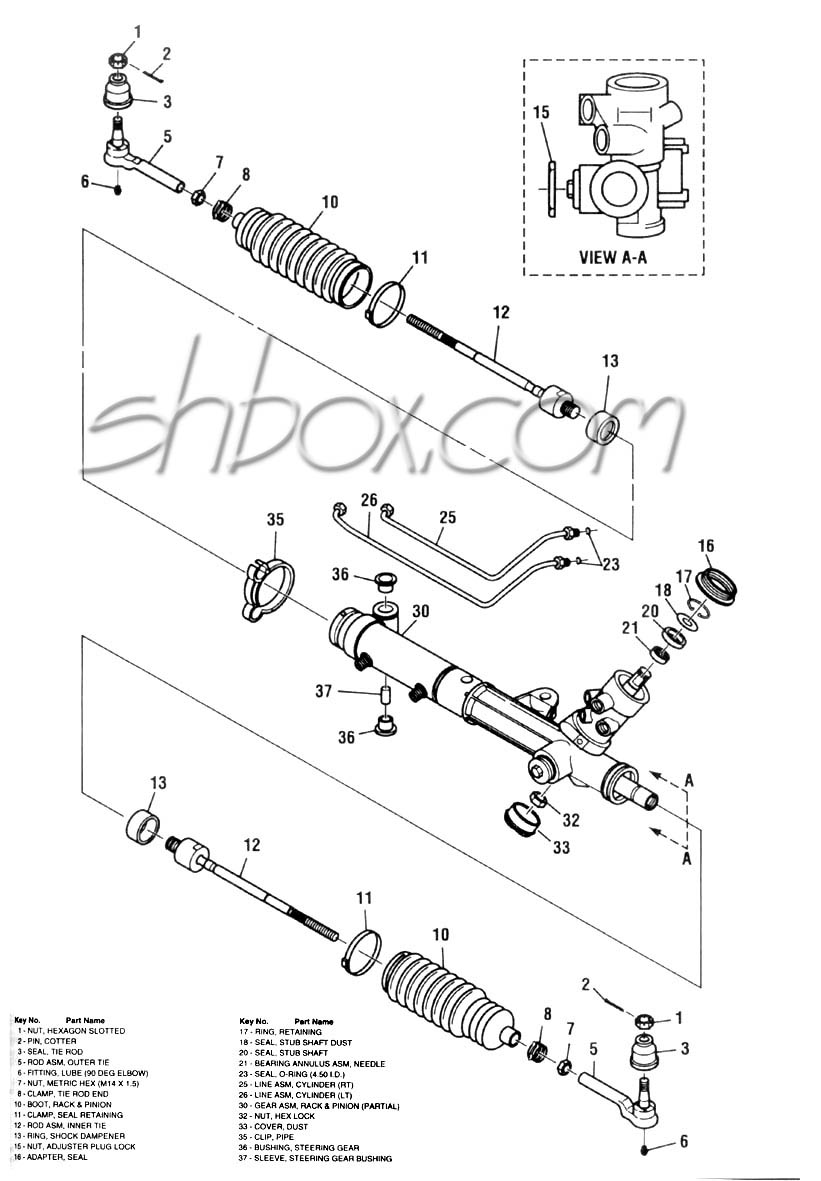
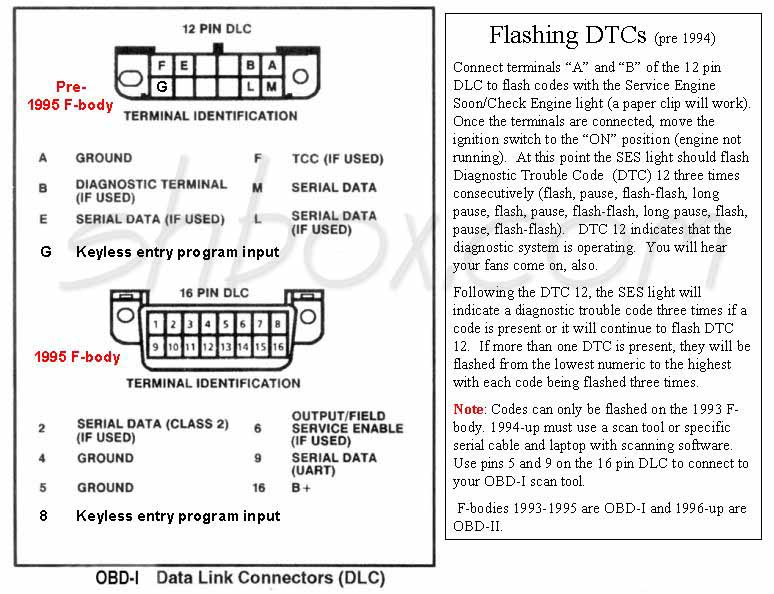